How to Use The google adword Keyword Planner
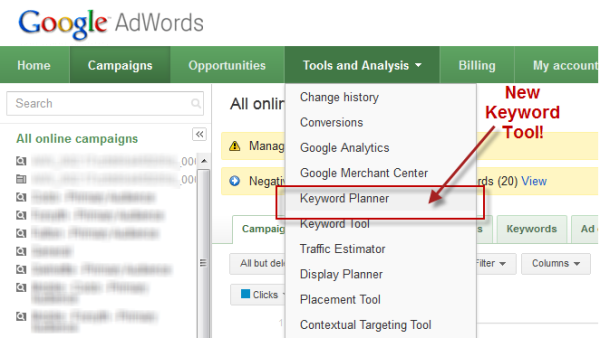
This new keyword tool combines elements of two existing keyword tools, the Google Keyword Tool and the AdWords Traffic Estimator, adding a more structured and integrated workflow as well as all sorts of new bells and whistles.
If you’ve ever used the Google Keyword Tool and/or AdWords Traffic Estimator in the past, take note here – the new Keyword Planner will most certainly replace both tools in the near future, and your workflow will undoubtedly change as a result.
What’s A Keyword Planner, Anyway?
The Keyword Planner is a more focused version of the Google Keyword Tool and AdWords Traffic Estimator tool, and the focus is on doing one thing only: to make it easier for advertisers to get through the process of creating new ad groups and ad campaigns, which is the key to getting your PPC accounts off to a good start.
It differs from the existing Google Keyword Tool and AdWords Traffic Estimator tools in that the old tools were more general purpose, unstructured tools. They could be used for just about anything, including Keyword Research for SEO. This new tool, on the other hand, is more like an ultimate AdWords campaign building workshop.
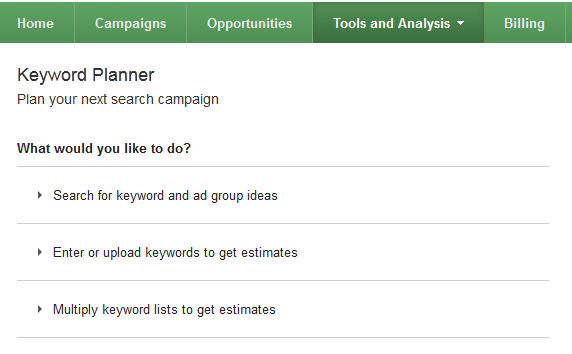
The Keyword Planner has a “wizard” type interface. The first step in the process is to determine how you’re going to go about creating your ad campaigns and ad groups. You’re asked to pick one of 3 possible paths:
- Search for Keyword and Ad Group Ideas
- Enter or Upload Keywords to get Estimates
- Multiply keyword lists to get Estimates
Here’s what this looks like in AdWords:
Searching For Keyword & Ad Group Ideas
Most of the time when creating a new campaign in AdWords, you’ll need to rely on Google to provide you with keyword suggestions to pick from. Therefore, the primary flow through the Keyword Planner is to “Search for keyword and ad group ideas.”
Clicking on that option whisks you off to the next stage of the Keyword Planner, which provides a robust keyword workbench for researching and picking keywords to add to your AdWords account, illustrated below:
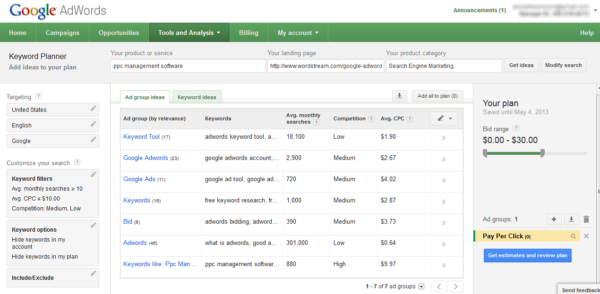
Using this interface, the Keyword Planner lets you brainstorm keywords using any or all of the following three methods:
- By Keyword: you can type in a word or phrase relevant to your business
- By Landing Page: by entering a landing page on your site (or any competitor’s webpages, for that matter), the Keyword Planner will scan and infer keywords that are relevant to those pages
- By Product Category: you can select from one of thousands of pre-defined keyword categories
Filtering Keywords From Your Keyword Plan
Additionally, the Keyword Planner provides robust filtering capabilities so you can be super picky with what keywords you choose to add to your PPC account. For example, you can filter keywords based on the following ways:
- Average CPC: include or exclude keywords that fall above or below a desired Cost Per Click
- Estimated Search Volume: include or exclude keywords that fall above or below a desired monthly search volume
- Keyword Competition: you can narrow your list based on estimated advertiser competition
- Exclude Keywords Already In Your Account: the Keyword Planner can automatically exclude keywords that are already in your own AdWords account to avoid having duplicate keywords
- Filter by Keyword: you can specify to include or exclude keywords containing specific terms
Setting Targeting Parameters
Because keyword research requires analyzing keyword statistics in order to determine whether or not a given keyword makes sense for your business, Google lets you customize the keyword stats and performance estimates so that they’re relevant to your campaigns. This means they let you specify targeting parameters such as language, country and search network.
List View Vs. Grouped View
One nice feature is the ability to view keywords in the Keyword Planner that appear either in list view or in grouped view – this is analogous to the concept of keyword niches and keyword lists.
Your “Keyword Plan”
As you discover promising terms looking at individual keywords or keyword groupings, you have the ability to add them to “Your Plan,” which is a temporary storage area for saving interesting-looking keywords and keyword groupings for later.
The Keyword Planner maintains state for the duration of your session – keywords that you add to “Your Plan” are saved while you’re in the process of looking for keywords.
This is a nice change — previously, when using the Google Keyword Tool and AdWords Traffic Estimator separately, there was a bit of a disjointed workflow where you had to save the results of the Google Keyword Tool, then open the file and copy/paste it as input to the AdWords Traffic Estimator. These two separate processes are now integrated into a single, seamless one.
When you’re done picking keywords and adding them into “Your Plan,” click on the Get Estimates and Review Plan button.
Getting Estimates & Reviewing Your Plan
The next stage of the Keyword Plan process involves setting a keyword bid and daily budget for your portfolio of keywords and keyword groupings.
Since keyword volume and CPC bid estimates are based on your budget, bid, location and other competitive factors, you’ll need to provide Google with some information in order to customize your estimates.
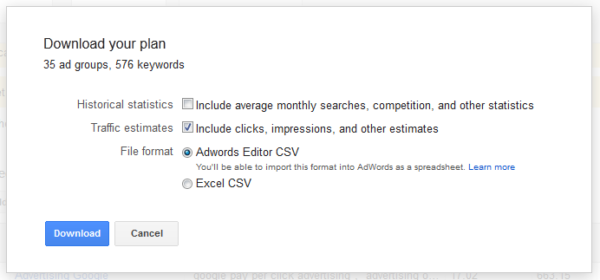
For example, you could enter a bid of $50 and a daily budget of $2,000.00 and click on the Get Detailed Estimates button — the Keyword Planner will then generate daily estimates for Clicks, Impressions, Average ad position and costs, as shown below:

Enter Or Upload Your Own Keyword List
Another way of running though the Keyword Plan process is to start using your own keyword list. Sometimes, when creating a new campaigns, you may be fortunate enough to already be sitting on a treasure trove of keyword data (for example, several years of Web analytics data, including valuable keyword referral data).
If you’re in this enviable position, it may make sense to start the campaign creation process using your own keyword list rather than the generic keyword suggestions you get from the Keyword Suggestion Tool. Here’s what that looks like:
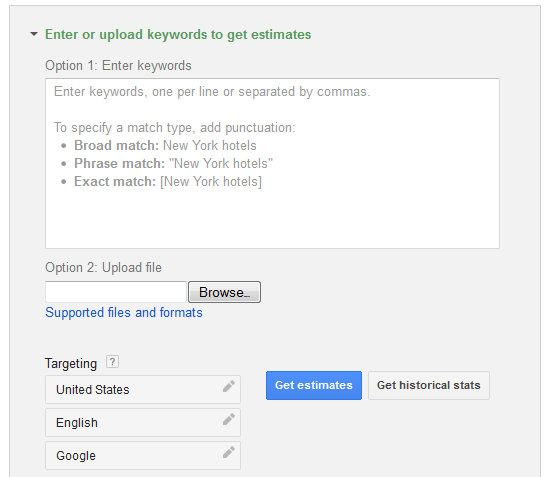
When you press the Get Estimates button, you’ll be taken through the rest of the Keyword Plan process as described above — the only difference is that you’ll be looking at your own keyword list rather than the generic keywords suggested via the Google Keyword Tool.
Multiplying Keyword Lists Using Keyword Planner
A third and final way to work thorough the Keyword Planner is to mash-up and multiply keyword lists. For example, you might want to multiply a bunch of names of products with colors and word modifiers to come up with every imaginable keyword permutations, as shown below:
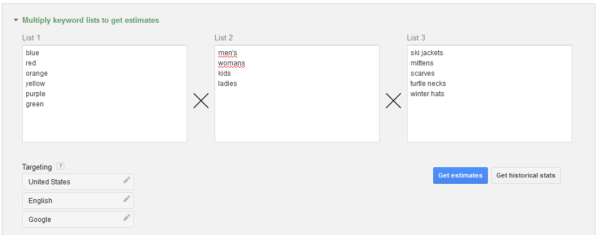
Note that you can have up to three lists to mash up, and clicking on the Get Estimatesbutton brings you to the next stage of the Keyword Planner. The only difference between this and the other two methods is that you’ll be looking at your own keyword list based on the mash-up of the lists you provided.
I personally don’t like this option very much because your mashed-up keyword lists may bear little or no resemblance to how people naturally search for those words, though perhaps you could use this method if you absolutely don’t want to miss any possible keyword permutation.
Summary
The new Keyword Planner tool supports various workflows for building ad groups and campaigns either starting from scratch, or based on your existing lists, and provides more cohesive user experience by integrating the keyword selection, grouping, analysis and filtering aspects of the keyword selection workflow.
If you’re lucky, you can find the Keyword Planner tool in your AdWords account today. According to my contacts at Google, as of two weeks ago, it was enabled in only 5% of accounts. At that time, it took me 67 tries to finally find an account with the Keyword Planner; but as of today, I’m finding it in roughly one out of every 5 accounts. It appears that Google is opening up Keyword Planner access to a greater number of accounts over time, so hopefully you’ll see it in your account soon!
No comments:
Post a Comment