Pages

Tuesday, 31 March 2015

how to delete facebook account permanently

How do I permanently delete my account

https://www.facebook.com/help/delete_account

first login to your face book account

click this link to permanently delete your facebook https://www.facebook.com/help/delete_account

You have 2 options here: deactivate your account or delete it permanently. Deactivating is essentially the same as deleting, except that all your data is retained, but not visible until you reactivate.
To deactivate:
  • Visit your Account Settings
  • Choose "deactivate account"
  • Fill out the form, and click "Deactivate My Account"
To delete:

I deleted it! How can I get my account back

If you deleted your account, this can not be undone. If you only deactivated it, simply login to your Facebook account again, and Facebook will send you a confirmation email to reactivate.

how to optimize blogger to search engines

 how to optimize blogger to search engines

1. Keyword Research

While it might be a dream come true, it’s not realistic to think that your site is going to rank for every keyword you could ever want. Many are simply too competitive, and a new website must do proper keyword research in order to find the right keywords. The ones you select should bring in traffic but also have an appropriate amount of competition.
Ever since Google released the new Hummingbird update, SEOs have started the shift from individual keyword phrases to topics. Hummingbird focuses more on the intent of the phrase with a better understanding of what the context means. This allows search engines like Google to answer questions with web pages even if that page is not optimized for that phrase.
That said, doing keyword research with the Google Adwords tool can still give you some good ideas for keywords. You want keywords that have low to medium competition in an area.

2. Great content (the longer, the better)

Great content is now a requirement to rank well. Search engines rank pages with bad grammar and spelling lower. This means that sites with well-written content are finally starting to get the ranking they deserve.
“How long should my content be?” is a question many people ask. While there really isn’t an exact answer, most people agree that 500 words is a good minimum length for your normal blog post.
It’s also a good idea to mix in longer authority posts. Research has shown that longer posts (over 1,000 words) tend to rank better—keep in mind, Google really likes authoritative posts with 2,000+ words.
Starting in August 2013, Google introduced in-depth articles as a new type of search result. Google separates these articles by placing them in a special box on the right side of the search results with other highly authoritative articles on the subject.
To improve your chances of getting an in-depth article status in the future, it must have the highest quality content, be over 2000 words, and not be promotional in any way.
One final tip: Length isn’t the only thing that matters. Make your posts fun to read. Avoid boring, stuffy content that looks like a legal document. Instead, opt for more conversational, amusing content when writing reviews, essays and guides.

3. Natural keyword usage

The primary rule for mixing your keywords into your content is to make sure they sound natural to the reader. When you write for your reader (not to game search engines) and use natural keyword placement, you can actually rank better with search engines.

4. Page titles

Your page titles should have the keyword phrase you’re targeting but also be descriptive for the reader. For example, if your article is about “Labrador training,” then a good title might be “Labrador Training in Six Easy Steps.”
The page title should not exceed 70 characters. Although search engines will index longer titles, they will be truncated in the search results.

5. Header tags

It’s generally a good idea to include the keyword phrase in an occasional header tag, but don’t overdo it. If you’re going to include a keyword phrase in a header tag, it is best to use the first heading on the page (H1) because Google will pay more attention to it.

6. Optimized URLs

You can put keywords in your URLs, but don’t overdo it. (e.g., www.labrador-training-strategies.com/labrador-training.html)
This looks suspect, with an exact match domain and a keyword-optimized url. However, a branded root domain with an optimized url is fair game, like such: http://livingtechnically.blogspot.in/. The root domain still has “SEO” in it, but it’s also a branded company.

7. Page load time

According to WebProNews, when Google added page speed into their algorithm, sites that had slow load times saw a drop in traffic from Google. Page load speed is a ranking factor for Google.
In order to fix page load speed problems:
  • Measure how long a page takes to load.
  • Optimize your website to improve performance.
  • If you are using a shared hosting server, you can try switching to a different hosting provider to see if it makes a positive difference.
  • After making changes, measure performance again.
If you use WordPress, make sure you keep plugins to a minimum, as they will only bog down your site if there are too many. Also, stick with a lean code (such as Thesis and Genesis) or a website builder (here is a good list for those) that allows you to customize and tweak the code. This doesn’t necessarily help page speed, but it keeps your blog from looking cookie-cutter and generic.
It’s a good idea to periodically check your page load on a few random pages to make sure changes to your site have not affected performance.

8. Internal linking

Make sure you link your content with other internal pages that would be beneficial to your readers. This will help improve your site’s SEO and will make it easier for your readers to navigate and find more of your useful content.

9. Google authorship

Google authorship is easy to set up in your content and your Google+ profile. It allows you to establish yourself as an authority in your niche and as a result, Google will rank pages higher for your site.

10. Responsive (mobile) design

I recently read that roughly 56% of American adults are now buying smart phones and browsing the Internet with them. This is why it is critical that you use a responsive (i.e. mobile) design for your website so that pages easily show up on the small screen.
Google also recommends a responsive design because it makes it easier for visitors to have a single URL. Your web pages will load faster because your website doesn’t need to be redirected to another page for a mobile device.

Sunday, 29 March 2015

How to Lock file Without Any Software with Password

 How to Lock file Without Any Software with Password

Really you can lock folder using batch files. So Lock everything.......


Step 1: Open Notepad

First of all open Notepad

Step 2: Copy and Paste

Just copy and paste it to the notepad
@ECHO OFF
title lokendra's-hacking-ideas
if EXIST "Control Panel.{21EC2020-3AEA-1069-A2DD-08002B30309D}" goto UNLOCK
if NOT EXIST MyFolder goto MDMyFolder
:CONFIRM
echo Are you sure to lock this folder? (Y/N)
set/p "cho=>"
if %cho%==Y goto LOCK
if %cho%==y goto LOCK
if %cho%==n goto END
if %cho%==N goto END
echo Invalid choice.
goto CONFIRM
:LOCK
ren MyFolder "Control Panel.{21EC2020-3AEA-1069-A2DD-08002B30309D}"
attrib +h +s "Control Panel.{21EC2020-3AEA-1069-A2DD-08002B30309D}"
echo Folder locked
goto End
:UNLOCK
echo Enter password to Unlock Your Secure Folder
set/p "pass=>"
if NOT %pass%== Hello1goto FAIL
attrib -h -s "Control Panel.{21EC2020-3AEA-1069-A2DD-08002B30309D}"
ren "Control Panel.{21EC2020-3AEA-1069-A2DD-08002B30309D}" MyFolder
echo Folder Unlocked successfully
goto End
:FAIL
echo Invalid password
goto end
:MDMyFolder
md MyFolder
echo MyFolder created successfully
goto End
:End

Step 3: Save It

Now save it as locker.bat
your saved file will look like this -

Step 4: Open That

Double click on locker.bat file
A new folder named "MyFolder" will be created.
Now move your all content to this folder.

Step 5: Lock

Done. Double click on locker.bat file and it will ask you for locking folder. Type y and hit enter.
Refresh and your folder will disappear means locked.

Step 6: How to Open

Double click on locker.bat File and now it will ask for password.
By default the password is Hello1. Enter it and your folder will appear.

add popup window in blogger

Popup window is an extra window it's open in load on page or click on mouse and many other type now we will learn how to add click on mouse open popup window in blogger.

Pop up window is very use full for any important page show to viewers .


Click below Images for help with Screen short

 
Just follow below steps for add a popup window in your blogger
1.     Log in to your Blogger account
2.     Go to Design > Page Elements
3.    Click Add a Gadget.
4.     Select HTML/JavaScript widget
5.     Copy the below code and past it in HTML/java script box.
<script type="text/javascript">
document.body.onclick= function(){
window.open('your web address', 'poppage', 'toolbars=0, scrollbars=1, location=0, statusbars=0, menubars=0, resizable=1, width=650, height=650, left = 300, top = 50');
}</script>
    Note 1. - your web address'  Replace this with your Web url (web address)
 Note 2.-   width=650, height=650  You can customize Window size.


6. Now save your Template your popup window is ready

How to use WhatsApp on your PC/ laptop without Bluestacks

Ever wished to use WhatsApp from your computer? That too without using BlueStacks or any other emulators and virtual machines? Here is a quick and easy method that is completely free, reliable and friendly on your computer resources.
 How to use WhatsApp on your PC/ laptop without Bluestacks
What you need:

Here is how you can use WhatsApp running on your computer:
  1. Run WART and give your phone number with country code.
    Example: 61 is the country code for Australia (http://countrycode.org/)
     How to use WhatsApp on your PC/ laptop without Bluestacks

  2. Leave the password field blank and click on Request Code button.

  3. You will get a SMS/call from WhatsApp shortly with a code.

  4. Type the code in the WART tool and click on Confirm Code button. It will give you a password, copy it to a text file.

  5. Install Pidgin but do not run it. If it launched automatically, use Ctrl + Q to quit it or Buddies -> Quit.

  6.  How to use WhatsApp on your PC/ laptop without Bluestacks
  7. Copy the last-whatsapp.dll file into plugins directory within your Pidgin installation (Pidgin Portable/Apps/plugins or C:\Users\\AppData\Roaming\Microsoft\Windows\Pidgin\plugins).
     How to use WhatsApp on your PC/ laptop without Bluestacks

  8. Launch Pidgin.

  9. Click on Add button if Pidgin launches the user account setup wizard automatically. If not, click on Accounts > Manage Accounts > Add.
     How to use WhatsApp on your PC/ laptop without Bluestacks

  10. In Basic tab, Login Options section, Select WhatsApp as the protocol. Your phone number with country code as user name Give the password you got from WART in step 4.

  11. Click on Add button.

To give an instant message:
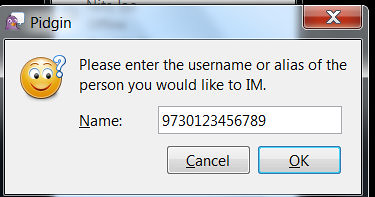
Click on Buddies > New Instant Message > Give your friend's phone number with country code > Click on OK button.
 How to use WhatsApp on your PC/ laptop without Bluestacks
To add a buddy:
Click on Buddies > Add Buddy > Give your friend's phone number with country code and provide other details > Click on Add button.
 How to use WhatsApp on your PC/ laptop without Bluestacks
PS: If you are Linux/ Mac user, you can also enjoy WhatsApp. Steps are almost same, just go through the instructions here: github.com/davidgfnet/whatsapp-purple

Friday, 27 March 2015

how to Back Up my apple iPhone 4S to iCloud

You used to be able to back up your iPhone 4S content using only iTunes, but with Apple’s introduction of iCloud, you can back up via a Wi-Fi network to your iCloud storage.
You get 5GB of storage (not including iTunes-bought music, iTunes Match and Photo Stream content, video, apps, and e-books) for free or you can pay for increased storage (10GB for $20 per year, 20GB for $40 per year, or 50GB for $100 per year).
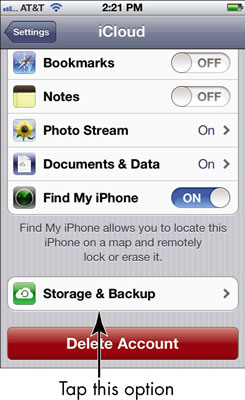
  1. To perform a backup to iCloud, first set up an iCloud account and then tap Settings on the Home Screen.
  2. Tap iCloud and then tap Storage & Backup.
    image0.jpg
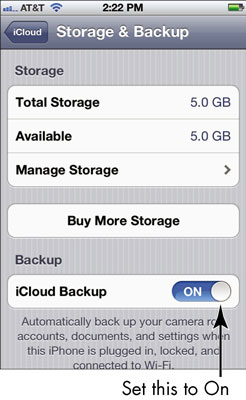
  3. In the pane that appears tap the iCloud Backup On/Off switch to enable automatic backups. To perform a manual backup, tap Back Up Now.
    A progress bar shows how your backup is moving along.
    image1.jpg

How to Lock and Unlock Your iPhone Lock & Unlock Your Mac Automatically Based on Your iPhone's

 How to Lock and Unlock Your iPhone  Lock & Unlock Your Mac Automatically Based on Your iPhone's

You can lock your iPhone so its touch screen doesn't work. This prevents the iPhone from dialing phone
numbers, playing music, or doing anything else when it's in your pocket, rubbing against your pants, or in your purse making contact with keys and other stuff. Apple makes locking your iPhone a snap.

In fact, you don’t need to do anything to lock the iPhone; it happens automatically, if you don't touch the screen for one minute.

Can’t wait that long? To lock the iPhone immediately, press the Sleep/Wake button. To unlock it, press the Sleep/Wake button again. Or, press the Home button on the front of the screen. Either way, the on-screen slider appears, but your iPhone doesn’t actually awaken until you drag the slider to the right with your finger.


Step 1: Install Near Lock for iOS & Mac OS X

Near Lock, from developer Filip Divnjak, turns your iPhone into a wireless key for your Mac, automatically locking your computer when you walk away and unlocking it when you come back. Before you jump right in, make sure your devices are compatible with Bluetooth 4.0 LE (Low Energy) first below.
  • iPhone 4S or later
  • iMac late 2012 or later
  • MacBook Air 2011 or later
  • MacBook Pro 2012 or later
  • Mac mini 2011 or later
  • Mac Pro late 2013 or later
If you're good to go there, download the Near Lock app on both your iPhone and Mac using the links below. Make sure you've allowed the installation of apps from unidentified developers in Mac OS X first.
  • Near Lock for iOS
  • Near Lock for OS X

Step 2: Connect Your iPhone & Mac with Near Lock

After everything is installed, open up the app on your Mac, followed by your iPhone. Near Lock on your iPhone will automatically begin scanning for your computer via Bluetooth.
Once your iPhone finds your computer, a window saying "iPhone wants to connect!" will appear on your desktop; click on "Accept" to proceed.
On your iPhone, you'll be asked to enter the login password for your Mac. None of the information is sent to Near Lock's servers, so don't worry; it's all kept locally on your device. When you tap on "Connect," everything will be set up.

Step 3: Choose Your Distance for Near Lock

After the connection is established, you'll be asked to enable both "Near Lock" and "Fast Lock."
  • Near Lock locks your computer when you walk away and unlocks it when you approach.
  • Fast Lock locks your computer any time you tap the the center icon on your iPhone.
Set the distance your iPhone must be from your Mac in order to initiate the lock. I chose 1.5 meters for the distance, so that means my computer will lock anytime my iPhone is 1.5 meters or farther from my computer, and unlock anytime I'm inside of that distance.
[1] Setting your distance. [2] Unlocked at 0.7 meters. [3] Locked at 2.0 meters.
In the middle screenshot above, you can see the iPhone is 0.7 meters away from my computer, which is well inside the 1.5 meters proximity, so my Mac stays unlocked. In the far right screenshot, you can see my iPhone at 2.0 meters away from my Mac, so the computer is now locked and can only be entered if I walk inside of 1.5 meters, or if my password is entered manually.
Note that the distance may not be exact based on the current environment based on the building materials and any possible wireless obstructions.

Near Lock's User Preferences

You can also toggle the "Near Lock" feature from the menu bar icon on your computer, as well as set the distance and disable the whole application. You can access more settings through the gear icon, where you can enable start on boot, set what happens when a connection is lost, choose logout actions, and check for updates.

Making the Most Out of Near Lock

Unfortunately, you'll need to have Near Lock open on your iPhone for it to work using the free app. With the "Pro Mode" version, available for $3.99 through an in-app purchase, you'll be able to run the app in the background on your iPhone, which might be well worth it if you're constantly leaving your computer alone. And since Near Lock uses Bluetooth LE, you can pretty much leave the app running in the background all day long without noticing any significant battery drain on your iPhone.
Combine Near Lock with Laplockhttp://livingtechnically.blogspot.in/, which sounds off a loud alarm anytime someone unplugs the charger from your MacBook, and you'll have quite the security setup for your workspace.

How to Sync Address Book Contacts with iPhone 4S


How to Sync Address Book Contacts with iPhone 4Simage0.jpg
If you are using iCloud to sync contacts, DO NOT enable contacts in iTunes. You may miss the warning in fine print, so heed this warning in big type: IF YOU ENABLE SYNCING WITH iCLOUD AND ALSO ENABLE IT IN iTUNES, YOU MAY END UP WITH DUPLICATED DATA ON YOUR iPHONE. You won’t like that, so enable syncing one way or the other — via iCloud or in the iTunes Info pane.
The iPhone syncs with the following address book programs:
  • Mac: Address Book and other address books that sync with Address Book, such as Microsoft Outlook 2011 or the now discontinued Microsoft Entourage
  • PC: Windows Contacts (Vista and Windows 7), Windows Addressbook (XP), Microsoft Outlook, and Microsoft Outlook Express
  • Mac and PC: Yahoo! Address Book and Google Contacts
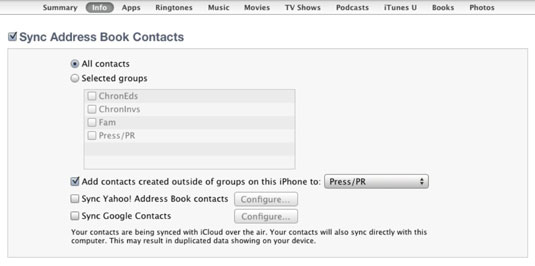
Now, here’s what each option in the Sync Contacts section does:
  • All Contacts: One method is to synchronize all your contacts, which is what the figure shows. This will synchronize every contact in your Mac or PC address book with your iPhone’s Contacts app.
  • Selected Groups: You can synchronize any or all groups of contacts you’ve created in your computer’s address book program. Just select the appropriate check boxes in the Selected Groups list, and only those groups will be synchronized.
  • Yahoo! or Google Contacts: If you use Yahoo! Address Book, select the Sync Yahoo! Address Book Contacts check box and then click the Configure button to enter your Yahoo! ID and password. If you use Google Contacts, select the Sync Google Contacts check box and then click the Configure button to enter your Google ID and password.
  • If you use Yahoo!, note that syncing doesn’t delete a contact from your Yahoo! Address Book if the contact has a Yahoo! Messenger ID, even if you delete that contact on the iPhone or on your computer. To delete a contact that has a Yahoo! Messenger ID, log on to your Yahoo! account with a web browser and delete the contact in your Yahoo! Address Book.
If you sync with your employer’s Microsoft Exchange calendar and contacts, any personal contacts or calendars already on your iPhone will be wiped out.

How to Synchronize Your iPhone with Your Computer

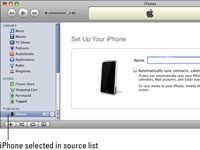
When you connect your iPhone to your computer, iTunes should launch automatically. If it doesn’t, chances are you plugged the cable into a USB port on your keyboard, monitor, or hub. Try plugging it into one of the USB ports on your computer instead.


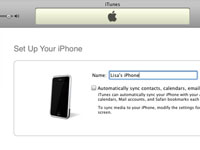
You see the Set Up Your iPhone pane, as shown here.


This figure shows the name Lisa’s iPhone.


If that’s what you want, click the check box next to Automatically Sync Contact, Calendars, Email Accounts, and Bookmarks to make a check mark appear. Then click the Done button.
If you want to synchronize manually, make sure the check box is unchecked and click Done.
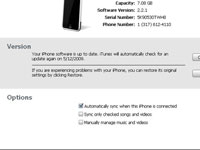
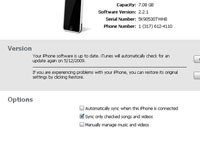
After you click the Done button, the Summary pane should appear. If it doesn’t, make sure your iPhone is still selected in the source list and click the Summary tab near the top of the window, as shown here.
And, of course, if you decide to uncheck the Automatically Sync When This iPhone Is Connected check box, you can always synchronize manually by clicking the Sync button in the bottom-right corner of the window.
By the way, if you’ve changed any sync settings since the last time you synchronized, the Sync button will instead say Apply.

Thursday, 26 March 2015

how to optimize your blog posts for seo

how to optimize your blog posts for seo

Here are six easy search engine optimization (SEO) tips to help get your blog noticed.
1) Do your research. Keyword research is essential for on page optimization. Chances are you are naturally including keywords without realizing it simply by providing valuable content on a topic. However, there are a variety of tools and techniques for finding related keywords relevant to your blog post that you may not have considered. The Google Adwords Keyword Tool and semrush.com both offer great tools that allow you to find keywords related to your topic and even spy on your competition to see what words and phrases they are targeting to bring traffic to their sites.

2) Utilize keywords throughout your post. Once you have targeted a couple of valuable, relevant keywords, it is important to place them where they will have the most impact for humans and search engine crawlers indexing your content. Try to include them in the following places:

1.Title
2.Headings and subheadings
3.Introductory sentence
4.Concluding paragraph
5.Anchor text (text you hyperlink to other related pages on your site)
6.Title tags and meta descriptions

A word of caution: Don’t engage in keyword stuffing, which is the act of filling your content with so many keywords that it becomes difficult to read. Not only will this irritate your blog followers, it will also get you penalized by Google. A couple of strategically placed keywords will do the trick.

3) Optimize your images. Whenever you upload a photo to your blog, be sure to include keywords in the file name and fill out the alternate text field with a brief, keyword rich description of the photo.

4) Reference others with links. When you mention another blogger or article in your blog post, include a link to the information you are referencing. Not only is it good blogging etiquette, but you may also get lucky and receive a link back. Quality links are a valuable commodity for any site looking to rank higher in search engine results pages.

5) Give readers the opportunity to subscribe to your blog. Include prominently placed RSS or Feed Subscription Buttons and offer viewers the ability to subscribe to your posts via email when possible. This allows your blog followers to have instant notification of your latest posts without having to periodically check your site for new content.

6) Use social media to broaden the reach of your blog posts. As a small business, you may be utilizing Facebook, Twitter, Google+, or other social media sites to create connections with potential and current customers. Why not promote your blog content on these sites for even more web exposure? Free programs like Hootsuite make it easy to post links to your latest blog post on all of your social media sites with just a couple of clicks. You can even schedule your posts ahead of time!

Tuesday, 24 March 2015

Facebook Reportedly Testing Dialer and Caller ID Android App 'Phone'

Facebook Reportedly Testing Dialer and Caller ID Android App &#39;Phone&#39;

Facebook is said to be working on a new app called Phone, which will show users information about who is calling and come with other features like automatic blocking of calls from numbers blocked by the community.
According to a report by Android Police, some users got a notice to try the new Phone app, but received a page not found error when they tried to complete the download. As a result, there's very little known about the app, apart from the text that appeared on the screen.

http://livingtechnically.blogspot.in/
"Phone is a new app that shows you info about who is calling and automatically blocks calls from commonly blocked numbers," the description of the app read. It seems from the description that the app could be a replacement for the dialer app that comes with your Android phone. It is worth noting that Facebook already introduced the calling feature in its Messenger app.

Facebook has been lately working a lot on bringing more features to its mobile users. The firm this week announced a system to send money to friends for US customers using its Messenger app, something which was tipped in October last year.
According to Facebook, the money transfer will use bank debit cards of members for cash transfer, which may take up to three days depending on the banks used.
Before that, Facebook, which has about 745 million users logging in daily from their mobile phones, added a feature that lets users of its apps add stickers over photos before they are shared on the world's biggest social network.

How to Download and Manually Install Android 5.1 Lollipop

 How to Download and Manually Install Android 5.1 Lollipop
Google on Monday began rolling out the first major update to its Android 5.0 Lollipop operating system. The update, Android 5.1 Lollipop, will be rolled out to various devices, with the Nexus series the first in line to get the latest version. The Nexus 5, Nexus 7 Wi-Fi and the Nexus 10 are the three devices that will get this update first as Google posted Android 5.1 Lollipop factory images for these devices on its website. If you can't wait for the OTA update to arrive, you can use these images to install Android 5.1 Lollipop on your device.
You can manually download and install the Android 5.1 Lollipop factory image from Google's website. This process is not recommended for anyone but the most advanced users who have a bit of technical know-how. This process will erase all your data, so make sure you back up your Android device first. If you understand the risks and own a Google Nexus 5, Nexus 7 Wi-Fi or a Nexus 10, you can use these steps to flash the latest version of Android Lollipop on to your device.
1. Download and install the latest Android SDK on your Windows computer. This installs two programs, ADB, and Fastboot, which can be accessed through the command terminal on your PC, as a part of the software development kit.
2. Add the SDK folder to the PATH by following these steps:
  • Right click My Computer and click on Properties. 
  • Click on Advanced System Settings. 
  • Click on System Properties > Advanced > Environment Variables. 
  • In the window, select Path, then click on Edit, and then type in the name of the directory where you installed the SDK, and remember that each entry is separated by a semi-colon.
3. Enable USB debugging on your device. First, go to Settings > About Phone > Software information.
4. Tap Build number seven times.
5. Go to Settings > Developer options. Tick USB debugging.
6. Download the correct factory image for your device.
Android 5.1 Lollipop for Nexus 5
Android 5.1 Lollipop for Nexus 7 (Wi-Fi)
Android 5.1 Lollipop for Nexus 10
7. Extract the image on your computer.
8. Connect your device to your computer over USB.
9. Start the device in fastboot mode.
For Nexus 5, hold the volume up, volume down and power buttons while powering on the device. The full list of key combinations for different devices can be found here.
You can also boot into fastboot mode using the ADB tool: With the device powered on, go to the command terminal and execute the following: adb reboot bootloader
If needed, unlock the device's bootloader through your computer using the command terminal and executing: fastboot oem unlock
  1. Open a command terminal and navigate to the unzipped system image directory.
  2. Execute flash-all.bat, which was a part of the unzipped image file. This script installs the necessary bootloader, baseband firmware(s), and operating system. For this to work, you need to have added the folder where ADB and Fastboot are installed to the system's path as described in step 2.
  3. When this is done, Google recommends that you lock the bootloader for security. You can do that by booting the device in fastboot mode while still connected via USB, and using the command terminal to execute: fastboot oem lock.
While this method will install Android 5.1 Lollipop on your Nexus device, we still suggest that you wait for the OTA update to ensure a hassle-free update process.

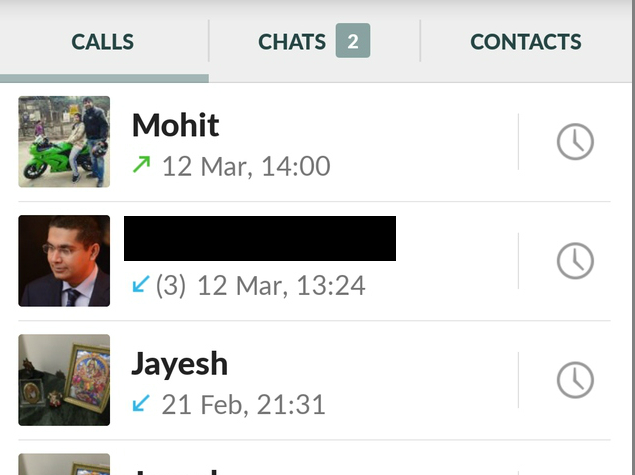
How to Activate Voice Calling in whatsapp

WhatsApp's voice calling feature is now available to all Android users. The world's most popular messaging app with over 700 million monthly active users only introduced this feature recently and rolled it out gradually to its Android users. If you are not an Android user, you'll just have to wait a little longer to get this feature. But if you use Android, and haven't yet activated voice calling on WhatsApp, what are you waiting for?
The process isn't as simple as updating WhatsApp to start using the voice calling features. It involves a couple more steps that you need to follow. We've described these below, so take a look to enable voice calling on WhatsApp for Android.
  1. Download the latest version of WhatsApp for Android from here. The latest version on WhatsApp's website is 2.12.7, but if you're downloading from Google Play, ensure that your device has version 2.11.561. Older versions don't support this feature for all users.
  2. Once you have the latest version of WhatsApp installed on your Android phone, ask someone who has WhatsApp calling enabled to make a WhatsApp call to your number.
  3. Multiple users have reported that giving a missed call doesn't work. You'll have to receive the call and wait for a few seconds before disconnecting to activate WhatsApp voice calling.
  4. When the feature is enabled on your smartphone, you'll see a new three-tab layout on WhatsApp, one each for Calls, Chats and Contacts.

Friday, 20 March 2015

how to change sbi internet banking passwords

 SBI INTERNET BANKING PASSWORD CHANGE PROCESS

state bank of india provide the internet banking to all state bank  India customers.  in this post i will explain you to how to change passwords in sbi internet banking follow this steps and change your passwords easyly.

STEP 1

go to https://retail.onlinesbi.com/retail/login.htm#. login to your state bank of India account. user name and password provide account holder branch.

STEP 2

after login to your account you see the profile option on the menu bar. click on profile. choose the change passwords in profile menu.

STEP 3

enter the your profile password for change your profile information. ofter enter pfofile password select the login password.

STEP 4

enter the old password in first column. enter the new password in second column. re enter the new password on third column.

STEP 5

click on submit button. your login password is changed complete.

HOW TO CHANGE PROFILE PASSWORD IN  STATE BANK OF INDIA


 STEP 1

go to https://retail.onlinesbi.com/retail/login.htm#. login to your state bank of india internet banking account.

STEP 2

after login to your account you see the profile option on the menu bar. click on profile. choose the change passwords in profile menu.


STEP 3

enter the your profile password for change your profile information. ofter enter pfofile password select the profile password.

STEP 4

enter the old password in first column. enter the new password in second column. re enter the new password on third column.

STEP 5

click on submit button. your profile password change is complete.