Wednesday, 17 June 2015
NiK's technical blog: Block ads throughtout your android phone
NiK's technical blog: Block ads throughtout your android phone: Advertisements are a necessary evil. Many websites and applications are providing you with free service, free content and free software be...
Youtube is scanning your videos
Youtube is scanning your videos: Yesterday I uploaded a video on Youtube that I created with photos and used some background music that i downloaded from net. In an hour, Y...
Adobe LightRoom
Adobe LightRoom: Tried Adobe LightRoom software today on some of my not so beautiful looking Raw images (of course bluebonnet flowers and kids are always ...
Monday, 13 April 2015
how connect mobile internet to pc
how connect mobile internet to pc
For Connect Android phone to PC OR Laptop, Perform 2 steps to follow.
1. Mobile Settings
2. Desktop computer OR laptop Settings
Before
Start Configuration, Note that "Data" Option should be Enable in
Android Phone. To Enable "Data", Go to settings -> Wireless &
Networks -> Mobile Networks –> Data Enable, Check this box (Check
Data Roaming in case of Roaming).
For Dual Sim Mobile Phones Select Sim1 OR Sim2 for Data Connection.
There are 2 Methods for connect Android Phones to PC OR Laptop for internet.
1.1 USB tethering
1.2 Portable Wi-Fi Hotspot
1.1 USB tethering
Plug in USB Cable from Your Desktop Computer/Laptop to Android Phone.
In Android phone go to settings -> Wireless & Networks ->Tethering & portable hotspot and tap it.
Now Check "USB Tethering".
Now You will be able to use the data connection from the phone on your PC/Laptop.
Configure
Wi-Fi Hotspot in Android Phone. For That go to settings -> Wireless
& Networks ->Tethering & portable hotspot -> Portable
Wi-Fi hotspot settings -> Configure Wi-Fi hotspot.
Network SSID – priceandspecification
Security – WPA2 PSK
Password – 87654321 or you can set any 8 digit number.
Save it.
In Android phone go to settings -> Wireless & Networks ->Tethering & portable hotspot and tap it.
Check "Portable Wi-Fi hotspot"
Now You will be able to use the data connection from the phone on your (Wi-Fi enabled Devices) PC/Laptop.
2.1 how to connect Android Phone to PC for internet – Windows XP
2.2 how to connect Android Phone to PC for internet – Windows 7
Follow the steps 1.1 For connect Android Phone to PC for internet Via USB.
Follow the steps 1.2 For connect Android Phone to PC for internet Via Portable Wi-Fi Hotspot.
Click Here to Download Android Mobile Modem Driver / USB Tethering Drivers / RNDIS driver download for Windows XP.
It
will Give you an error message “You can also try to download the
original document by clicking here”. OR “The file exceeds the maximum
size that we scan. Download anyway” You have to Click that link to
download Zip File.
Password for connect_android.zip File : priceandspecification.in
connect_android.zip contains 4 Files.
File 1. Install Hot Fix Windows Xp(WindowsXP-KB959765-x86-ENU).
File 2. In case of Path not found for R NDIS in Windows Xp, Browse this folder for Modem driver installation.
File 3. Tethering file for windows Xp. Right Click on it and click on Install.
File 4. Select O.S. 32 bit or 64 bit, Browse path and install drivers
Follow the steps 1.1 For connect Android Phone to PC for internet Via USB.
Follow the steps 1.2 For connect Android Phone to PC for internet Via Portable Wi-Fi Hotspot.
In
Windows 7 R NDIS driver are automatically installed on connect android
mobile to PC via USB, In case of Driver not Installed Properly, Download
connect_android.zip. And Use File 4.
how to change Wireless Router Admin Password
how to change Wireless Router Admin Password
here are the general steps you will need to follow in order to change and/or reset the password on your wireless router:
If you have completely lost the password that you set and need to set the router back to its factory default password, perform the following steps:
Below are general instructions only. Directions vary by make and model of router. Please consult your router's operating manual before performing any kind of reset procedure, and always follow proper safety precautions indicated in your router's documentation.
PLEASE NOTE: The first step in this process will wipe out all of your router's configuration settings and set them back to their out-of-the-box factory defaults. You will have to change all your routers settings such as your wireless network SSID, password, encryption settings, etc, after performing this step.
1. Press and hold the reset button on the back of your wireless router
You will probably have to hold the reset button from 10 to 30 seconds depending on your brand of router. If you hold it for too short a time it will simply reset the router but won't revert back to its factory default settings. On some routers you may have to use a pin or thumbtack to press the button if it is recessed inside the router.
2. Connect a computer to one of your router's Ethernet ports (but not the one that says WAN)
Most router's have a web browser-accessible administrator page that you must log in to in order to access the router's configuration settings. Some routers disable administration via wireless, so you will need to ensure that you are connected to the router via an Ethernet cable before attempting to access the router's configuration page.
3. In the browser address bar, enter the IP address of your router's administration interface
Most routers have what is called a non-routable internal IP address such as 192.168.1.1 or 10.0.0.1. This is an internal address that cannot be accessed from the internet.
Here are the standard admin interface addresses used by some of the more popular wireless router manufactures. You may have to consult your specific router's manual for the correct address. The following list is some of the default IP addresses based on my research and may not be accurate for your specific make or model:
Linksys - 192.168.1.1 or 192.168.0.1
DLink - 192.168.0.1 or 10.0.0.1
Apple - 10.0.1.1
ASUS - 192.168.1.1
Buffalo - 192.168.11.1
Netgear - 192.168.0.1 or 192.168.0.227
4. Enter the default administrator login name (usually "admin") followed by the default administrator password.
You can locate the the default admin name and password for your specific router by checking the manufacturer's website or by Googling "Default Admin Password" followed by your router's brand name and model.
5. Click on the "Admin" page from your router's configuration page and create a strong password
Be sure you enter a strong complex password for your router's admin password. If you ever looe this password you will have to repeat the steps above.
If you didn't lose you router password but just don't know how to change it, you can skip steps 1 and 2 and enter the admin user name and password that you have into step 4. This will allow you to change your wireless router's password without wiping out all your other router's settings.
Tuesday, 7 April 2015
how to Optimizing AdSense Revenue Using Google Analytics
how to Optimizing AdSense Revenue Using Google Analytics
Recently Google Analytics launched two important new capabilities for its AdSense integration:AdSense Exits reports and AdSense Revenue as an experiment objective. They both come as a great additions to websites that use AdSense for monetization. In this post I will go over the the AdSense Analytics integration and how it can be used to optimize AdSense revenue.
Integrating AdSense and Google Analytics
Before going further into the wonders of the Analytics AdSense marriage, you should first be sure that your accounts are linked properly. Here is how to do it. First follow the steps in the screenshot below after logging into Google Analytics (Admin => AdSense Linking => Link Accounts):
 |
| AdSense and Analytics Integration (click for full size) |
You will be sent to your AdSense account in order to confirm the linking and then you will be sent back to Google Analytics to choose which profiles should include this data. If you have any problems or additional questions, take a look at the AdSense Help Center. After the integration is complete the following metrics will be available on your Google Analytics account:
- AdSense revenue: revenue generated by AdSense ads.
- Ads clicked: the number of times AdSense ads were clicked.
- AdSense CTR (click-through rate): the percentage of page impressions that resulted in a click on an ad.
- AdSense eCPM: AdSense revenue per 1,000 page impressions.
- AdSense ads viewed: number of ads viewed.
- AdSense Page Impressions: the number of pageviews during which an ad was displayed.
Currently, there are 3 out-of-the-box AdSense reports available on Analytics: Pages, Referrers and Exits. You can find them here (direct link to report).
1. AdSense Pages
This report provides information about which pages contributed most to AdSense revenue. It will show each of the pages on the website and how well they performed in terms of AdSense. For each page in the website that contains an AdSense unit we will be able to analyze the following metrics: AdSense revenue, AdSense ads clicked, AdSense CTR, AdSense eCPM, AdSense ads viewed and AdSense page impressions.
This report provides an interesting view of which page performed best, and it can be used to optimize website content. For example, if you find that posts about celebrities generate more revenue than posts about soccer, you might consider writing more about celebrities (if your main objective is to make money on AdSense.)
2. AdSense Referrers
This report provides information about the performance of domains that referred visitors who generated AdSense revenue. This information is extremely valuable; however, I suggest using a different report, since it provides more in-depth information: “All Traffic”.
The AdSense Referrers only displays information about websites that generated AdSense Revenue, it does not provide information on other types of traffic sources and campaigns. For this reason, I believe the All Traffic report presents a more complete view. To find the report, go to this page (direct link to report) and click on the AdSense tab just above the chart.
3. AdSense Exits
AdSense Exit report shows the number of sessions that ended due to a user clicking on an AdSense ad. This is an interesting metric as it can show which pages have a "high conversion rate", i.e. the ratio of visits to a page and those that left the website clicking on an AdSense unit through it. If your monetization is made through AdSense this report will give just that: AdSense conversion rate per page.
Optimizing AdSense revenue using Google Analytics
Below is an example of how to use the integration from my Analytics for Publishers eBook. Most websites work with templates and each template may have different AdSense placements; this means that an important analysis would be to compare performance by template (or by category) rather than by page.
In order to analyze template performance, we will need to create one segment per template. If you want to learn more about creating Segments, check this Help Center article. For example, let’s suppose your website has the following page templates:
- Analytics pages with URLs structured as example.com/analytics/...
- Testing pages with URLs structured as example.com/testing/...
- Targeting pages with URLs structured as example.com/targeting/...
In this case you would create three segments using the dimension Page, each containing its unique pattern: /analytics/ for analytics pages, /testing/ for testing pages, and /targeting/ for targeting pages. Below is an example of how the segment would look for the analytics pages:

After creating the segments for all three templates, you will be able to choose all of them in the top-left corner of the screen (just above the chart, see bubble #1 above) to see a comparison between them. Below is a screenshot showing how such a comparison would look like:

In the table above we are able to compare pages by all metrics available. For example, we can see that while the Analytics section has higher revenue, this is related to the number of impressions, which is also significantly higher. When we analyze further, we see that the Testing and Targeting sections have a good potential, with the same CTR but significantly higher AdSense eCPM. Based on these metrics we can understand which templates and content types are the most effective.
As mentioned above, once you find out which pages are performing well and which pages are not, you can use Content Experiments to optimize them. Here is a Content Experiments guide.
Closing Thoughts
Here are a few takeaways for you to start optimizing today!
- Understand which content type and subject generates the highest revenue and create content based on this data.
- Understand which page templates bring the best results by using advanced segments.
- Analyze AdSense performance to learn which segments have a good CTR; this might bring insight into which audience to target.
How to install Google Analytics on a Blogger blog
I) Creating an account with Google Analytics
- Go to Google Analytics, click the Sign-Up Now link on top right corner of the page and sign in to your Google Account.
- On the next page click the Sign up button.
- Next supply all the necessary details -account name, blog URL you wish to track, time zone, data sharing preferences, and your country or territory.
- Read the terms of service and tick the “Yes, I agree to the above terms and conditions” checkbox.
- Click Create Account button and you’ll be taken to Tracking Code Configuration tab.
- The next step is to find the Web Property ID (a.k.a UA number) -a unique ID given to the account you just created. Disregard all other items in this tab, the only thing you need is the UA number.
- Copy the UA number as you’ll need to paste it later on.


II) Installing Google Analytics on your blog
This is a two-step process. First you need to register the Web Property ID with Blogger, and then import the tracking code into your template.
Adding Google Analytics ID to your blog
- If you are using the new Blogger interface, click the dropdown menu next to the name of the blog you wish to track and navigate to Settings > Other > Google Analytics. (For old interface, go to Settings > Basic > Google Analytics Web Property ID).
- Paste in the UA number into the Google Analytics Web Property ID text box.
- Click Save Settings.
- If you are using the new Blogger interface, click the dropdown menu next to the name of the blog you wish to track and navigate to Settings > Other > Google Analytics. (For old interface, go to Settings > Basic > Google Analytics Web Property ID).
Adding your tracking code
The following<include>tag will import your GA tracking code into your blog:<b:include name='google-analytics' data='blog'/>If you are using a latest Layout or Dynamic Views template from Template Designer gallery, you can skip the following steps because it already has the<include>tag built-in. The same applies to mobile templates.But if you are using an older Layout template or a third party template you might need to add it into your template manually. Here’s how:- Go to Template > Edit HTML (for old interface it’s Design > Edit HTML) and locate the
</body>tag. - Insert the code right above the tag (if the code isn’t already there).
- Save your template.
- Go to Template > Edit HTML (for old interface it’s Design > Edit HTML) and locate the

It could take 24 hours before your first data to appear in your account. This is because Google Analytics updates reports every 24 hours. Come back to Google Analytics Dashboard the next day and if everything is in order you will see your stats!
How to Add Tag Cloud to Blogger
How to Add Tag Cloud to Blogger
This post is related to adding tag cloud to blogger using lebels.
Below is the step by step guide to cloud tag blogger using lebels
1. Login into your Blogger.com account.
2. Click Layout option
3. Now Under “Page Elements” look for “Add a Gadget” link.
4. Click “Add a Gadget” link
5. Look for "Labels" option
6. Click “labels”

7. Now, Click to select “Cloud” option
Here
 you will see other options:
- To select Alphabetically (Click this-Recommended)
- By Frequency
- Show number of posts per label (Uncheck This option- Recommended)
8. Click Save button to see lebels as your cloud tag in blogger blog (This option will show all lebels as blogger cloud)
If you wish to show selected lebels in cloud in your Blogsopt/blogger blog, then

- Go to Step 7
- Once you have completed Step 7
- Then Look for “Selected Labels” which is under “show” section
- Click “Selected Labels” then you will find “Edit” Option, click "Edit"
- Here you can choose lebels which you want to show in cloud(see Image)
Example-Check section, Tags to see how cloud is created in this blog
Useful tips while using other Widget to Cloud tag in Blogger
*Use the Widget provided by third party only if you have coding knowledge (This will help you in judging, the errors)
*Always Save the Original Template of Blogger before adding Cloud tag codes in Blogger
* Seek professional help, if you get error while implementing
We have tested various other Widget to add tag cloud to blogger, however came across errors. When we make successful test of any other user friendly code for Cloud tag in Bloggerthen we will update the post
how to connect apple iphone to computer
how to connect apple iphone to pc via usb wifi itunes bluetooth
One of the greatest parts about having a smartphone is the ability to connect it to a computer. This allows the individual to send photos, music, and other documents directly from the phone to the computer, and vice versa. There are three ways you can connect the iPhone to a computer. These are via a USB cord, Bluetooth, and Wi-Fi, each of which is done in different ways.Connect Using USB Cord
The
first way to connect the iPhone to the computer is by using a USB
cord. The USB cord should come with the iPhone. Simply plug in the USB
cord to your iPhone, and place the other side of the USB cord into the
USB port on the computer.
Connect to iTunes
After
connecting the USB cord to the computer, iTunes should automatically
run. If you do not see iTunes pop up, you may have connected the USB
cord into the wrong port. If you are sure you have connected properly,
manually open iTunes, as you may have automatic sync turned off.
Set Up iPhone
After
you have entered iTunes, a setup screen should appear. You will need
to name your device (i.e. Lisa's iPhone). Then, you will need to select
whether or not to have automatic syncs, and what documents will be
synced each time you connect the iPhone to your computer. After you've
customized your preferences, you can begin transferring documents
between your iPhone and computer.
Remove Connection from Computer
You
cannot simply remove the iPhone from the USB cord, as this can cause
damage to the files on the smartphone. Instead, you must eject the
device. You can do this by hitting the eject button located next to the
name of your iPhone in iTunes.
Connect Using Bluetooth
If
you don't have a USB cord, you may opt to connect using Bluetooth. In
order to connect your phone using Bluetooth, you will need to have a
computer that has Bluetooth capabilities.
*a) Turn on Bluetooth
*b) Search for Discoverable Devices on Your Computer
*c) Select Your Smartphone and Connect
*d) Transfer Files
*a) Turn on Bluetooth
*b) Search for Discoverable Devices on Your Computer
*c) Select Your Smartphone and Connect
*d) Transfer Files
Connect Using Wi-Fi
If you do not have a USB cord or a Bluetooth capable computer, you will need to try connecting with Wi-Fi.
*a) Find Available Wi-Fi Connections on iPhone
*b) Select the Wi-Fi Connection Being Used By Your Computer.
*c) Transfer Files
It is incredibly easy to connect an iPhone to a computer. There are three different connection options to choose from. Even if you don't have a USB cord or a computer with Bluetooth, you are still able to connect. After connecting, you will be able to send a variety of documents and files between both devices.
How to install WhatsApp and other apps on Nokia X from 'unofficial' sources
How to install WhatsApp and other apps on Nokia X from 'unofficial' sources
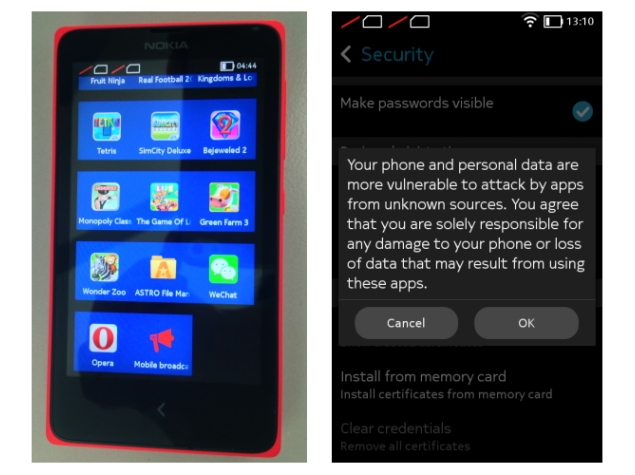
It's well known now that Nokia's new not-quite-Android budget smartphone, the Nokia X, is fully capable of running a huge number of Android apps, even those that aren't available in Nokia's own store app. Fortunately, it's also pretty easy to find these apps and install them. We'll take you through a simple tutorial so you can take advantage of this too.Due to competition with the Windows Phone platform and limitations of the AOSP (Android Open Source Project) fork that Nokia has created for the X family, the Google Play store is not available on the Nokia X. This means that a lot of popular apps, such as WhatsApp, aren't easily available to users.
 If
apps aren't available in Nokia's own store, users have the option of
checking any of four other Android app stores: 1mobile market, SlideME
market, Aptoide, and Yandex Store. These are available from the Nokia
store homepage as well as search results pages. Once installed, you can
use any of them just as easily as the native app store.
If
apps aren't available in Nokia's own store, users have the option of
checking any of four other Android app stores: 1mobile market, SlideME
market, Aptoide, and Yandex Store. These are available from the Nokia
store homepage as well as search results pages. Once installed, you can
use any of them just as easily as the native app store.For example, you can open the 1mobile market, and either choose a category to browse through or search for a title directly. Downloads and installs happen as usual.
For apps that are still beyond reach, Nokia allows side-loading from third-party sources. Android apps can be downloaded in APK format, although security is definitely a concern since APK files can be manipulated and infected with malware just like PC software installation files.
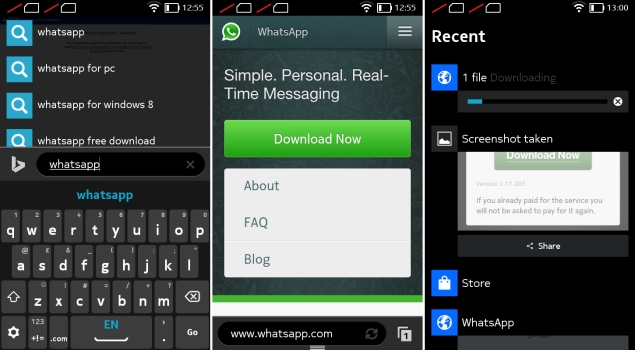
 A
small number of companies such as Whatsapp offer APK files directly
from their own websites. Various download sites, such as
www.download.com, also offer APK files for certain apps. You can load
these files onto your Nokia X via a USB cable or simply download them
through the browser.
A
small number of companies such as Whatsapp offer APK files directly
from their own websites. Various download sites, such as
www.download.com, also offer APK files for certain apps. You can load
these files onto your Nokia X via a USB cable or simply download them
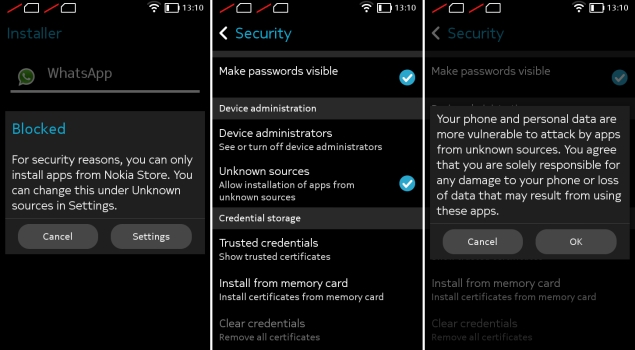
through the browser. You can tap the filename from the Fastlane screen if it's just been downloaded, or find it in the Downloads app. The first time you try installing an APK, you'll see an error message informing you that installing apps from third-party sources isn't allowed for security reasons, but that you can change this in the Settings.
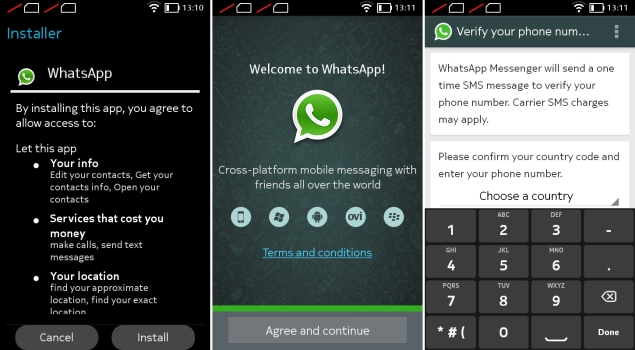
When you tap the Unknown Sources checkbox in the Security sections to allow this, you'll see a second warning message. After this, you're free to install anything you like, accepting the risk. You can tap the APK filename again now, and installation will proceed without any trouble.
 Some
apps, especially those which require Google services, might not run or
might have limited functionality. You won't be able to sign in to Google
services to share game scores, and location-sensitive apps which rely
on Google Maps also won't function.
Some
apps, especially those which require Google services, might not run or
might have limited functionality. You won't be able to sign in to Google
services to share game scores, and location-sensitive apps which rely
on Google Maps also won't function.How to Update my PS4
How to Update my PS4
With a bunch of great games like DriveClub and LittleBigPlanet 3 already available, and the likes of BloodBorne and Uncharted 4, amongst others, on the horizon, the PlayStation 4 (PS4) is undoubtedly the most popular next-generation console right now.And the PS4 is getting better with each update, the latest of which promises to bring much awaited features such as Suspend/ Resume that's present on the Xbox One.
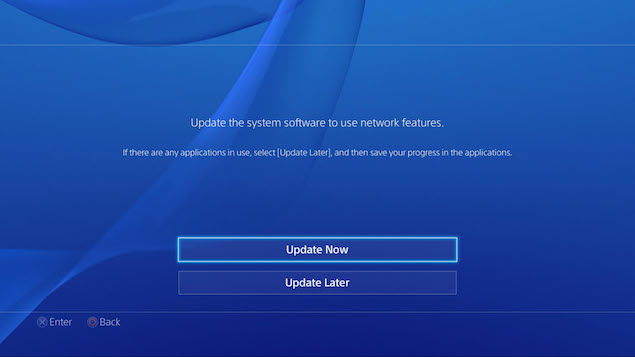
Another reason to keep your PS4 updated is to prevent losing access to network functionality. This makes itself felt with an annoying error message asking you to "Update system software to use network features." Updating system software fixes this and is necessary for games that have online multiplayer such as Destiny and Call of Duty: Advanced Warfare.
 Here's
what you need to know on how to update your PS4 - and there's a way to
do it even if the PlayStation 4 isn't connected to the Internet.
Here's
what you need to know on how to update your PS4 - and there's a way to
do it even if the PlayStation 4 isn't connected to the Internet.Update via the Internet
- If your PS4 is already connected to the Internet, switch it on. Either press the console's on button or the PlayStation button on the Dual Shock 4 controller. It's the button in the centre of the controller.
- On the home screen, select the toolbox icon called Settings.
- In settings, select System Software Update. Choose Update Using Internet.
This lets your console check for the latest firmware update. If you
aren't already on the latest firmware, you will be prompted to download
it and it should start immediately.

- The moment the download is complete there will be a notification on the left top corner. On the home screen, select the Notification icon and then select Downloads. In Downloads, choose the firmware file and follow the instructions to install it.
- Procure a USB flash drive. It should have at least 320MB free and be in FAT32 file format.
- Plug the flash drive into your PC's USB port. Open it and create a new folder. Name it PS4. In PS4, create another folder. Name it UPDATE. It is mandatory that the file names are named as is, in capital letters only, so it can be recognised by the PS4.
- Download the update file from Sony's website to your PC. Copy it to the UPDATE folder on your USB flash drive. The file name should be PS4UPDATE.PUP.
- Connect the USB flash drive to the PS4. From Settings, select System Software Update. Choose Update from USB Storage Device. Follow instructions to update.

- If the PS4 system does not recognise the update file, check that the folder names and file name are correct. Enter the folder names and file name in upper case.
- When
you insert a disc that contains a newer version of the system software,
it shows you a screen that guides you through the update process.
Follow the the instructions to update.

how to reset wifi password after forgot
how to reset wifi password after forgot
People keep forgetting their passwords all the time, but if there's one kind of password that no one bothers to remember it has to be the Wi-Fi password. Most people configure Wi-Fi networks once, enter the password on all their devices and forget about it completely. Until you buy a new phone, or a guest wants to access the network on their smartphone - that's when a frantic search for the Wi-Fi password ensues, before giving up and resetting your wireless router. Before you head down that path, here are a few tips to recover your saved Wi-Fi passwords.Note that this is not a guide to hack into Wi-Fi networks. That is illegal and could land you into far more serious trouble than you probably realise. These steps are only for recovering your own Wi-Fi password, and are impossible if you haven't already got access to the network on one of your devices. If you have forgotten the password of your Wi-Fi network, follow these steps to recover it.
Windows
While you might come across several apps that claim to let you recover saved Wi-Fi passwords, you don't need any of those on Windows PCs. Even if you don't have administrator access on your PC, you can look up the Wi-Fi password by following these steps. Note that this method only works when the security is set to Personal - if you're connected to an Enterprise network, such as your office Wi-Fi, then this method will not show the password.
1. Using a PC that is connected to the Wi-Fi network in question, go to Start > Control Panel > Network and Sharing Centre. On Windows 8 computers, you can tap Windows key + C, click Search and look for Network and Sharing Center.
2. Click Change adapter settings on the left sidebar.
3. Right-click the Wi-Fi network you're using and click on Status.
4. Click Wireless properties.
5. Click the Security tab.
6. Now you will see the name of the Wi-Fi network and the hidden password. Check Show characters to reveal the saved password.
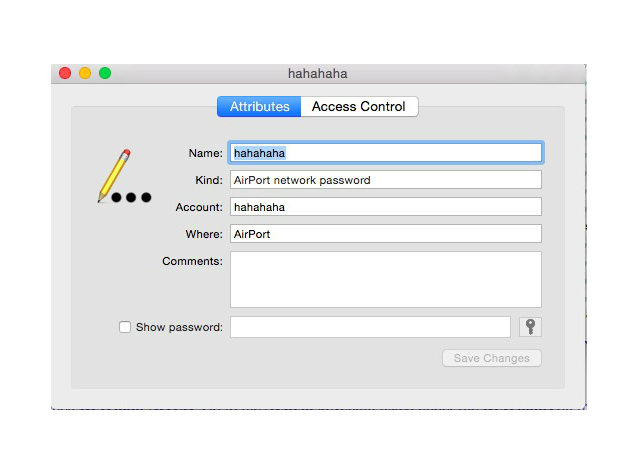
 Mac
MacYou can find saved Wi-Fi passwords through the Keychain Access app on the Mac. Here's how.
1. Go to /Applications/Utilities.
2. Open Keychain Access. Go to the System keychain listed under the Keychains on the top left.
3. Search for the Wi-Fi network you are trying to find the password for, by typing the name of the network (SSID) in the search box in the top right corner, or by manually finding it in the list.
4. Double-click the name of the network and in the resultant box, check the Show password option.
4. Enter the user account password when prompted and you'll be shown the saved Wi-Fi password in clear-text.
 Via the router
In case you don't have a Windows or Mac computer that has the Wi-Fi credentials saved, or if you're trying to do this with your phone or tablet, you can still try to find the saved Wi-Fi password through the router. Obviously this will only work if you're connected to the router's network - remember you can connect to the router with an Ethernet cable as well. Tablets and mobile phones can't proceed further unless they are already connected to the Wi-Fi network.
The steps will vary slightly with each router. Changing the wrong settings here may mess up the wireless network for everyone, so proceed at your own risk.
1. First, open your browser and go to the router's local address - this is usually http://192.168.1.1 - but the URL varies depending on the make of the router, so check the manual (or the official website) to find the correct address.
2. Enter the username and password. Again, this will vary by manufacturer, and you can and should change the passwords as well. By default though, on both MTNL and Airtel provided routers, both the username and password are "admin" without the quotes (other routers often have "password" without quotes as the default password) . You'll have to check with the router manufacturer or ISP if this combinations don't work.
3. Click Internet and then click Wireless. In some routers the Wireless option may be visible on the main screen.In this section you'll see the security type (WEP, WPA, etc.) and the key. Some routers may have these options under a Security tab.
The box next to the key field contains the password for the Wi-Fi network. On many routers this is in plain text, so you can just note it down.
 If all else fails...
You might have to reset the router if nothing else works. Don't do this unless you just can't connect to the network using any device. Resetting the router is an extreme step and you will have to reconfigure the network to restore your Internet connection. Unless you know how to do that, we suggest that you contact your ISP for help in this process.
We can't give you an accurate step-by-step guide for this because it varies quite a bit depending on the make of the router. You must check the user manual for your router before attempting this. Each router has a reset switch. Some routers have a tiny button, while other routers have this button hidden in a tiny hole (that you can hit using a paper clip). This switch needs to be pressed for a few seconds for the router to reset. Flashing lights on the router will tell you that it has been reset. Once that is done, wait for it to reboot and reconfigure the network. The exact steps for this process will also vary depending on your ISP, which is why we recommend contacting your ISP if you need to reset your wireless router, unless you know exactly what you are doing.
How to Download and Use Google Maps for Android without internet

How to Download and Use Google Maps for Android without internet
Lost in Nowhereland with no Internet connection as far as you can see? As always, Google Maps can help you find your way back, as long as you have an iOS or an Android device, even if you are offline. Google recently added a feature to Google Maps, which lets you save maps to your phone.Yes, you can now check maps even when there is no Internet connection. The downside is that you will not have access to route information, addresses, navigation, traffic, and a host of other data that require an Internet connection. However, having map data for reference might just save you a lot of time. Here's how to use this nifty feature on iOS and Android. The steps are identical for both platforms.
What you need to use this feature
You're going to need an Android or iOS device. Unfortunately, this feature isn't available on other platforms. Google Maps version 3, which was released last week on iOS, added support for offline maps. Android users, be sure to update to Google Maps version 8 before following the steps listed below.
How to save maps offline?
1. To use this feature, first sign in to your Google account to use this feature.
2. Type "OK Maps" in the search bar and hit the search button. A dialog at the top of the map asks "Save this map?" with a Save button at the bottom of the screen.
3. At this point, you can zoom in or out, and move the map, to select the area you want to save. Everything that is on-screen gets downloaded, so if you zoom out to save the entire Delhi area, for example, then you can later zoom in to see the individual localities and streets.
4. Once you've selected the area, tap the Save button at the bottom of the screen. A dialogue box pops up and you are asked to enter a name for the map. Just enter a name and tap on Save.
5. Accessing offline maps is easy. Just tap the 'person' icon, which is next to the directions icon on the search bar. This will take you to your profile. Scroll to the bottom to see your saved maps. You can rename saved maps in case you plan to save more than one.
There are certain limitations to saving offline maps. Zoom out too far and you will see an error saying that the map area can't be saved because it is too large. We were able to save almost all of Delhi, but Google Maps deemed the area "too large" when we tried to save National Capital Region (NCR).
There's nothing stopping you from saving multiple maps to cover a large area, in case you're worried about that. Another limitation is that map data is available only for 30 days. You'll have to download maps again after this.
The good thing is that the saved map of Delhi occupied just 9.9 MB of space on our phones. That's good news for those who are running low on storage space.
Sunday, 5 April 2015
How use android without hanging
How to speed up your Android mobile
Though the hardware of smartphones is steadily becoming more capable it can't be utilised to its fullest potential without the software to tap it. This is personal technology's modern hurdle - the optimisation of both hardware and software to ensure a fast and seamless user experience.The effects of this optimisation are most tangible for smartphone users, who in today's fast-paced world become impatient and frustrated if their smartphone starts slowing down, hanging, or otherwise impeding their productivity.
The slowdown of Android smartphones can be caused by several reasons, and usually starts becoming noticeable after several months of using them. Here are a few tips for users that feel their Android smartphones have slowed since they purchased the devices.
1. Install a third-party app launcher
Most Android smartphone manufacturers customise the OS on their devices, with specially-designed skins, launchers or UIs that sport widgets, layouts and other custom features in addition to the vanilla OS offering. While some users do find these customisations and added features useful, they can potentially slowdown the smartphone.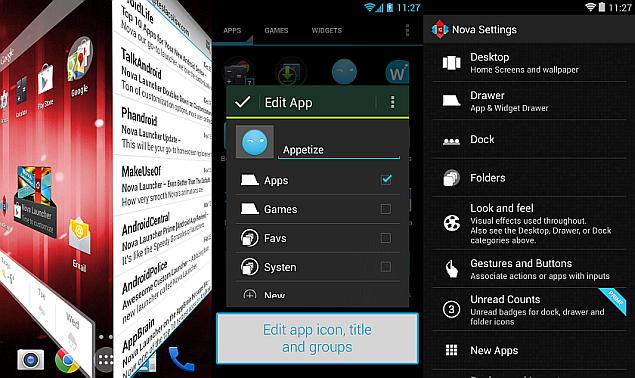 A simple workaround is to install a good third-party launcher (simpler than rooting or installing a custom ROM on the smartphone), which should remove most of the custom features, whilst also providing personalisation options. Some of the best launchers available in the Google Play store are 'Nova Launcher', 'GO Launcher EX', and 'Apex Launcher'.
 2. Remove extra apps, wallpapers, widgets
If users have a significant number of apps installed, it could slow down their smartphones. Users need to ask themselves if all the apps they have installed are being used, and then uninstall unused ones. Some apps cannot be uninstalled (especially bloatware apps from smartphone manufacturers), so users will have to settle for disabling them.
 Live wallpapers, and an excess of widgets on home screens, can also slow down smartphones, and if users are experiencing performance issues they should consider using static wallpapers instead, and removing any non-vital widgets.
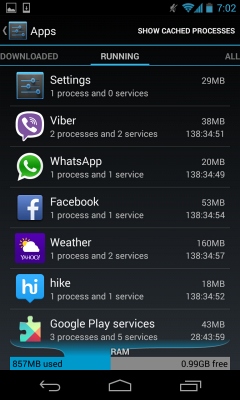
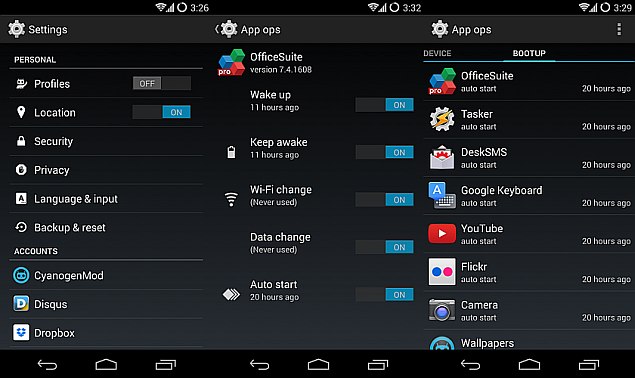
 3. Disable non-vital background processes, check syncing appsSome apps start up with the phone, while others are constantly syncing with online services. Both of these can dramatically slowdown users' smartphones. To check which apps are running in the background, users should visit the Apps section in Settings, and swipe to the 'Running' tab. If there are apps running in the background that are not being utilised, users should try uninstalling the apps, or disabling them, in case the apps can't be removed.
 Another thing to be checked is if there are apps that are syncing in the background, and if the benefits of syncing are being utilised by the user. If not, users can turn off synchronisation, saving both data and system resources. To do this, visit Settings>Data usage (could be a separate section called 'Usage' under 'Wireless & networks' menu, depending on your Android version), and scroll down to see which apps are using data.
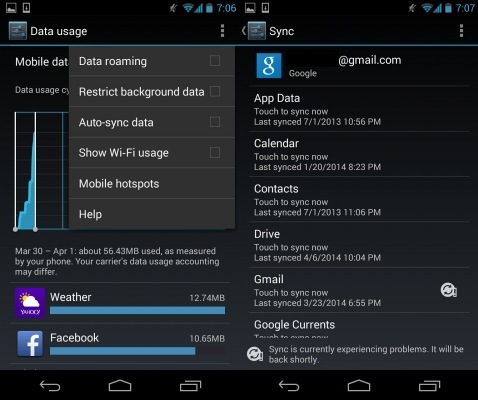 Users can then either visit individual app settings to turn off synchronisation, or visit the 'Data usage' section's context menu, which has the 'Auto-sync data' option (not present in all Android versions), which can be turned off.
 To do the same for any Google app or services, users will need visit Settings>Accounts>Google>UserProfile. Here they can turn off sync settings for individual Google apps and services.
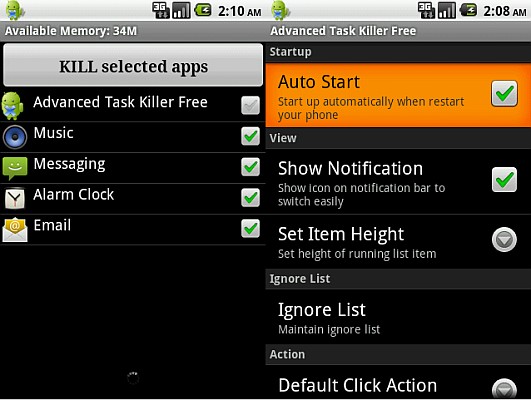 A must-install for Android smartphone users is Advanced Task Killer, which allows users to kill any apps that are taking too much memory (RAM) or slowing down the device for other reasons, such as instability.
4. Clear app cache
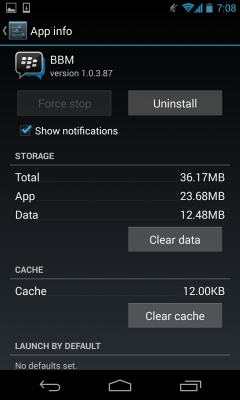
Much-used apps will build up a cache that can slowdown an Android smartphone, and users can delete each used apps' cache regularly to speed up their devices. Unfortunately, this will have to be a rather regular process, as apps will start rebuilding their cache from the moment they are launched. To individually delete each app's cache, users will need to visit Settings>Apps, select the relevant app, and then click on the 'Clear cache' button.
 To bulk-delete multiple apps' cache, or to set up scheduled cache-clearing, users can download a third-party application called 'App Cache Cleaner' from the Play Store, which can delete cache for multiple apps, and allow users to set up intervals for regular cache cleaning. Users can also delete cache data for all apps via a native Android option, found at Settings>Storage>Cached data.
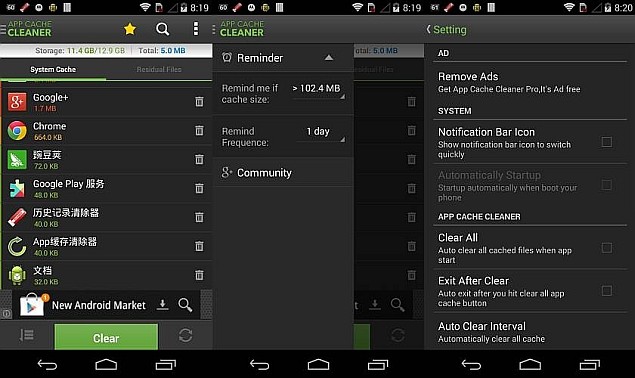 5. Disable animations
Animations are usually graphical transitions between menus, app drawers, and other interface locations. They use system resources to be generated, and occur quite regularly when navigating through a smartphone. They serve no purpose apart from beautifying the smartphone experience, and if users find their devices are slowing down, it is a good idea to turn off animations with no adverse impact on day-to-day use.
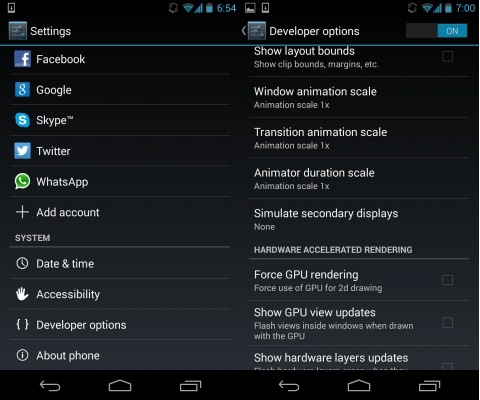 Turning off animations unfortunately is not very easy, with the option usually hidden behind the 'Developers options' section. To access 'Developers options', users need to visit Settings>System>About Phone where they can find the 'Build number' of their phone. Once they tap the 'Build number' seven times, users will then see 'Developer options' in the system menu. Here, they turn off all types of animation. Users should be careful not to turn on or off any other option in this section.
6. Clean out built-in storage
If the built-in storage of a smartphone is nearly full, the device will slow down quite dramatically. Between 10 and 20 percent of the total built-in storage should be available or free to avoid slowdowns. While a simple solution could be to simply delete all unused apps and clear cache data to save space, ideally users should be looking at a longer lasting solution. Most smartphones come with the option to expand built-in storage via microSD card.
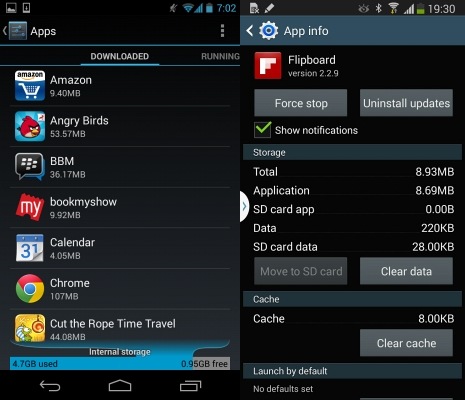 If users' smartphones feature microSD card storage expandability, they should move all media to it, such as pictures, music and videos. Apps can also be moved from internal storage to SD card, by visiting the app's settings via Settings>App and navigate to individual apps. Some older versions of Android don't support this feature, and users will have to download an 'Apps to SD card' app from the Google Play store.
7. Update firmware
While certain updates can have adverse effects, the general rule of thumb is that a firmware update for a smartphone will bring improvements of various types, usually including performance optimisations. Users experiencing reduced performance on their smartphones should check if the manufacturer has released a firmware update for them.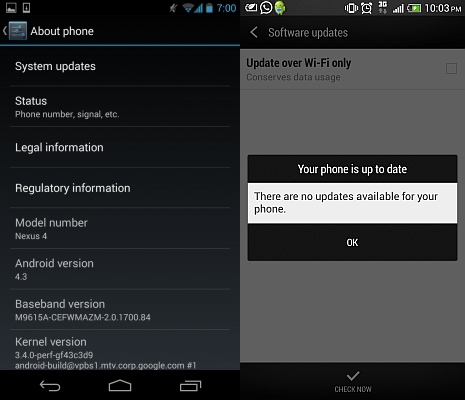 To do this, users should visit Settings>System>About>Software Updates and check if an update is available over-the-air. If not present here, users can also check by connecting their smartphones to the PC suite software provided by the manufacturer, and check for updates there.
While most updates do not require users to back up their smartphones before the update, we recommend users do so just in case something does go wrong - it's better to be safe than sorry.
8. Root phone, install custom ROM
While we don't recommend this method to anybody but a power user, the problem of a slowing Android smartphone is often solved by this method, with the user installing a custom ROM that is lighter and less-resource intensive than the manufacturer-customised UI and firmware. The method is similar to installing a third-party app launcher (Tip 1), however, has a much wider effect, essentially replacing all the software on the phone.
There are several guides and resources available online that can help users root their devices, and install custom ROMs from a database of independently developed firmware. XDA Developers Forum is one of the best resources for this, and users are recommended to read in detail the instructions and discussions about the specific custom ROM for their particular smartphone before going ahead. You can also visit CyanogenMod's website, which provides several easy installation tools and walkthroughs for its ROMs.
 Please note, rooting smartphones or installing custom ROMs on them is usually (there are some tools also available) a rather complicated task, and a risky one that can see users lose all their data, or end up with a bricked device. Rooting or flashing smartphones also usually voids manufacturer warranty.
9. SSD TRIM
Smartphones utilise solid state drives for their storage needs, and an inherent flaw with such a storage device is that when data is deleted from flash memory cells, the cells need to be completely wiped before they can used for a write process again. This requires the OS to issue a TRIM command to the drive to specific which cells are unused and should be wiped.
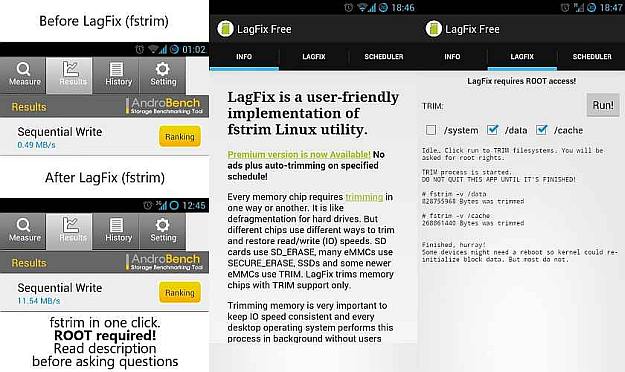 Google reportedly fixed this problem in Android 4.3 and higher, but if you are running an older version of Android, a solution does exist that will allow users to issue TRIM commands to the SSD. Users will need to root their smartphones, and install LagFixfrom the Play Store. Once again, rooting smartphones is a risky process and we recommend caution.
Subscribe to:
Comments (Atom)