Wednesday, 17 June 2015
NiK's technical blog: Block ads throughtout your android phone
NiK's technical blog: Block ads throughtout your android phone: Advertisements are a necessary evil. Many websites and applications are providing you with free service, free content and free software be...
Youtube is scanning your videos
Youtube is scanning your videos: Yesterday I uploaded a video on Youtube that I created with photos and used some background music that i downloaded from net. In an hour, Y...
Adobe LightRoom
Adobe LightRoom: Tried Adobe LightRoom software today on some of my not so beautiful looking Raw images (of course bluebonnet flowers and kids are always ...
Monday, 13 April 2015
how connect mobile internet to pc
how connect mobile internet to pc
For Connect Android phone to PC OR Laptop, Perform 2 steps to follow.
1. Mobile Settings
2. Desktop computer OR laptop Settings
Before
Start Configuration, Note that "Data" Option should be Enable in
Android Phone. To Enable "Data", Go to settings -> Wireless &
Networks -> Mobile Networks –> Data Enable, Check this box (Check
Data Roaming in case of Roaming).
For Dual Sim Mobile Phones Select Sim1 OR Sim2 for Data Connection.
There are 2 Methods for connect Android Phones to PC OR Laptop for internet.
1.1 USB tethering
1.2 Portable Wi-Fi Hotspot
1.1 USB tethering
Plug in USB Cable from Your Desktop Computer/Laptop to Android Phone.
In Android phone go to settings -> Wireless & Networks ->Tethering & portable hotspot and tap it.
Now Check "USB Tethering".
Now You will be able to use the data connection from the phone on your PC/Laptop.
Configure
Wi-Fi Hotspot in Android Phone. For That go to settings -> Wireless
& Networks ->Tethering & portable hotspot -> Portable
Wi-Fi hotspot settings -> Configure Wi-Fi hotspot.
Network SSID – priceandspecification
Security – WPA2 PSK
Password – 87654321 or you can set any 8 digit number.
Save it.
In Android phone go to settings -> Wireless & Networks ->Tethering & portable hotspot and tap it.
Check "Portable Wi-Fi hotspot"
Now You will be able to use the data connection from the phone on your (Wi-Fi enabled Devices) PC/Laptop.
2.1 how to connect Android Phone to PC for internet – Windows XP
2.2 how to connect Android Phone to PC for internet – Windows 7
Follow the steps 1.1 For connect Android Phone to PC for internet Via USB.
Follow the steps 1.2 For connect Android Phone to PC for internet Via Portable Wi-Fi Hotspot.
Click Here to Download Android Mobile Modem Driver / USB Tethering Drivers / RNDIS driver download for Windows XP.
It
will Give you an error message “You can also try to download the
original document by clicking here”. OR “The file exceeds the maximum
size that we scan. Download anyway” You have to Click that link to
download Zip File.
Password for connect_android.zip File : priceandspecification.in
connect_android.zip contains 4 Files.
File 1. Install Hot Fix Windows Xp(WindowsXP-KB959765-x86-ENU).
File 2. In case of Path not found for R NDIS in Windows Xp, Browse this folder for Modem driver installation.
File 3. Tethering file for windows Xp. Right Click on it and click on Install.
File 4. Select O.S. 32 bit or 64 bit, Browse path and install drivers
Follow the steps 1.1 For connect Android Phone to PC for internet Via USB.
Follow the steps 1.2 For connect Android Phone to PC for internet Via Portable Wi-Fi Hotspot.
In
Windows 7 R NDIS driver are automatically installed on connect android
mobile to PC via USB, In case of Driver not Installed Properly, Download
connect_android.zip. And Use File 4.
how to change Wireless Router Admin Password
how to change Wireless Router Admin Password
here are the general steps you will need to follow in order to change and/or reset the password on your wireless router:
If you have completely lost the password that you set and need to set the router back to its factory default password, perform the following steps:
Below are general instructions only. Directions vary by make and model of router. Please consult your router's operating manual before performing any kind of reset procedure, and always follow proper safety precautions indicated in your router's documentation.
PLEASE NOTE: The first step in this process will wipe out all of your router's configuration settings and set them back to their out-of-the-box factory defaults. You will have to change all your routers settings such as your wireless network SSID, password, encryption settings, etc, after performing this step.
1. Press and hold the reset button on the back of your wireless router
You will probably have to hold the reset button from 10 to 30 seconds depending on your brand of router. If you hold it for too short a time it will simply reset the router but won't revert back to its factory default settings. On some routers you may have to use a pin or thumbtack to press the button if it is recessed inside the router.
2. Connect a computer to one of your router's Ethernet ports (but not the one that says WAN)
Most router's have a web browser-accessible administrator page that you must log in to in order to access the router's configuration settings. Some routers disable administration via wireless, so you will need to ensure that you are connected to the router via an Ethernet cable before attempting to access the router's configuration page.
3. In the browser address bar, enter the IP address of your router's administration interface
Most routers have what is called a non-routable internal IP address such as 192.168.1.1 or 10.0.0.1. This is an internal address that cannot be accessed from the internet.
Here are the standard admin interface addresses used by some of the more popular wireless router manufactures. You may have to consult your specific router's manual for the correct address. The following list is some of the default IP addresses based on my research and may not be accurate for your specific make or model:
Linksys - 192.168.1.1 or 192.168.0.1
DLink - 192.168.0.1 or 10.0.0.1
Apple - 10.0.1.1
ASUS - 192.168.1.1
Buffalo - 192.168.11.1
Netgear - 192.168.0.1 or 192.168.0.227
4. Enter the default administrator login name (usually "admin") followed by the default administrator password.
You can locate the the default admin name and password for your specific router by checking the manufacturer's website or by Googling "Default Admin Password" followed by your router's brand name and model.
5. Click on the "Admin" page from your router's configuration page and create a strong password
Be sure you enter a strong complex password for your router's admin password. If you ever looe this password you will have to repeat the steps above.
If you didn't lose you router password but just don't know how to change it, you can skip steps 1 and 2 and enter the admin user name and password that you have into step 4. This will allow you to change your wireless router's password without wiping out all your other router's settings.
Tuesday, 7 April 2015
how to Optimizing AdSense Revenue Using Google Analytics
how to Optimizing AdSense Revenue Using Google Analytics
Recently Google Analytics launched two important new capabilities for its AdSense integration:AdSense Exits reports and AdSense Revenue as an experiment objective. They both come as a great additions to websites that use AdSense for monetization. In this post I will go over the the AdSense Analytics integration and how it can be used to optimize AdSense revenue.
Integrating AdSense and Google Analytics
Before going further into the wonders of the Analytics AdSense marriage, you should first be sure that your accounts are linked properly. Here is how to do it. First follow the steps in the screenshot below after logging into Google Analytics (Admin => AdSense Linking => Link Accounts):
 |
| AdSense and Analytics Integration (click for full size) |
You will be sent to your AdSense account in order to confirm the linking and then you will be sent back to Google Analytics to choose which profiles should include this data. If you have any problems or additional questions, take a look at the AdSense Help Center. After the integration is complete the following metrics will be available on your Google Analytics account:
- AdSense revenue: revenue generated by AdSense ads.
- Ads clicked: the number of times AdSense ads were clicked.
- AdSense CTR (click-through rate): the percentage of page impressions that resulted in a click on an ad.
- AdSense eCPM: AdSense revenue per 1,000 page impressions.
- AdSense ads viewed: number of ads viewed.
- AdSense Page Impressions: the number of pageviews during which an ad was displayed.
Currently, there are 3 out-of-the-box AdSense reports available on Analytics: Pages, Referrers and Exits. You can find them here (direct link to report).
1. AdSense Pages
This report provides information about which pages contributed most to AdSense revenue. It will show each of the pages on the website and how well they performed in terms of AdSense. For each page in the website that contains an AdSense unit we will be able to analyze the following metrics: AdSense revenue, AdSense ads clicked, AdSense CTR, AdSense eCPM, AdSense ads viewed and AdSense page impressions.
This report provides an interesting view of which page performed best, and it can be used to optimize website content. For example, if you find that posts about celebrities generate more revenue than posts about soccer, you might consider writing more about celebrities (if your main objective is to make money on AdSense.)
2. AdSense Referrers
This report provides information about the performance of domains that referred visitors who generated AdSense revenue. This information is extremely valuable; however, I suggest using a different report, since it provides more in-depth information: “All Traffic”.
The AdSense Referrers only displays information about websites that generated AdSense Revenue, it does not provide information on other types of traffic sources and campaigns. For this reason, I believe the All Traffic report presents a more complete view. To find the report, go to this page (direct link to report) and click on the AdSense tab just above the chart.
3. AdSense Exits
AdSense Exit report shows the number of sessions that ended due to a user clicking on an AdSense ad. This is an interesting metric as it can show which pages have a "high conversion rate", i.e. the ratio of visits to a page and those that left the website clicking on an AdSense unit through it. If your monetization is made through AdSense this report will give just that: AdSense conversion rate per page.
Optimizing AdSense revenue using Google Analytics
Below is an example of how to use the integration from my Analytics for Publishers eBook. Most websites work with templates and each template may have different AdSense placements; this means that an important analysis would be to compare performance by template (or by category) rather than by page.
In order to analyze template performance, we will need to create one segment per template. If you want to learn more about creating Segments, check this Help Center article. For example, let’s suppose your website has the following page templates:
- Analytics pages with URLs structured as example.com/analytics/...
- Testing pages with URLs structured as example.com/testing/...
- Targeting pages with URLs structured as example.com/targeting/...
In this case you would create three segments using the dimension Page, each containing its unique pattern: /analytics/ for analytics pages, /testing/ for testing pages, and /targeting/ for targeting pages. Below is an example of how the segment would look for the analytics pages:

After creating the segments for all three templates, you will be able to choose all of them in the top-left corner of the screen (just above the chart, see bubble #1 above) to see a comparison between them. Below is a screenshot showing how such a comparison would look like:

In the table above we are able to compare pages by all metrics available. For example, we can see that while the Analytics section has higher revenue, this is related to the number of impressions, which is also significantly higher. When we analyze further, we see that the Testing and Targeting sections have a good potential, with the same CTR but significantly higher AdSense eCPM. Based on these metrics we can understand which templates and content types are the most effective.
As mentioned above, once you find out which pages are performing well and which pages are not, you can use Content Experiments to optimize them. Here is a Content Experiments guide.
Closing Thoughts
Here are a few takeaways for you to start optimizing today!
- Understand which content type and subject generates the highest revenue and create content based on this data.
- Understand which page templates bring the best results by using advanced segments.
- Analyze AdSense performance to learn which segments have a good CTR; this might bring insight into which audience to target.
How to install Google Analytics on a Blogger blog
I) Creating an account with Google Analytics
- Go to Google Analytics, click the Sign-Up Now link on top right corner of the page and sign in to your Google Account.
- On the next page click the Sign up button.
- Next supply all the necessary details -account name, blog URL you wish to track, time zone, data sharing preferences, and your country or territory.
- Read the terms of service and tick the “Yes, I agree to the above terms and conditions” checkbox.
- Click Create Account button and you’ll be taken to Tracking Code Configuration tab.
- The next step is to find the Web Property ID (a.k.a UA number) -a unique ID given to the account you just created. Disregard all other items in this tab, the only thing you need is the UA number.
- Copy the UA number as you’ll need to paste it later on.


II) Installing Google Analytics on your blog
This is a two-step process. First you need to register the Web Property ID with Blogger, and then import the tracking code into your template.
Adding Google Analytics ID to your blog
- If you are using the new Blogger interface, click the dropdown menu next to the name of the blog you wish to track and navigate to Settings > Other > Google Analytics. (For old interface, go to Settings > Basic > Google Analytics Web Property ID).
- Paste in the UA number into the Google Analytics Web Property ID text box.
- Click Save Settings.
- If you are using the new Blogger interface, click the dropdown menu next to the name of the blog you wish to track and navigate to Settings > Other > Google Analytics. (For old interface, go to Settings > Basic > Google Analytics Web Property ID).
Adding your tracking code
The following<include>tag will import your GA tracking code into your blog:<b:include name='google-analytics' data='blog'/>If you are using a latest Layout or Dynamic Views template from Template Designer gallery, you can skip the following steps because it already has the<include>tag built-in. The same applies to mobile templates.But if you are using an older Layout template or a third party template you might need to add it into your template manually. Here’s how:- Go to Template > Edit HTML (for old interface it’s Design > Edit HTML) and locate the
</body>tag. - Insert the code right above the tag (if the code isn’t already there).
- Save your template.
- Go to Template > Edit HTML (for old interface it’s Design > Edit HTML) and locate the

It could take 24 hours before your first data to appear in your account. This is because Google Analytics updates reports every 24 hours. Come back to Google Analytics Dashboard the next day and if everything is in order you will see your stats!
How to Add Tag Cloud to Blogger
How to Add Tag Cloud to Blogger
This post is related to adding tag cloud to blogger using lebels.
Below is the step by step guide to cloud tag blogger using lebels
1. Login into your Blogger.com account.
2. Click Layout option
3. Now Under “Page Elements” look for “Add a Gadget” link.
4. Click “Add a Gadget” link
5. Look for "Labels" option
6. Click “labels”

7. Now, Click to select “Cloud” option
Here
 you will see other options:
- To select Alphabetically (Click this-Recommended)
- By Frequency
- Show number of posts per label (Uncheck This option- Recommended)
8. Click Save button to see lebels as your cloud tag in blogger blog (This option will show all lebels as blogger cloud)
If you wish to show selected lebels in cloud in your Blogsopt/blogger blog, then

- Go to Step 7
- Once you have completed Step 7
- Then Look for “Selected Labels” which is under “show” section
- Click “Selected Labels” then you will find “Edit” Option, click "Edit"
- Here you can choose lebels which you want to show in cloud(see Image)
Example-Check section, Tags to see how cloud is created in this blog
Useful tips while using other Widget to Cloud tag in Blogger
*Use the Widget provided by third party only if you have coding knowledge (This will help you in judging, the errors)
*Always Save the Original Template of Blogger before adding Cloud tag codes in Blogger
* Seek professional help, if you get error while implementing
We have tested various other Widget to add tag cloud to blogger, however came across errors. When we make successful test of any other user friendly code for Cloud tag in Bloggerthen we will update the post
how to connect apple iphone to computer
how to connect apple iphone to pc via usb wifi itunes bluetooth
One of the greatest parts about having a smartphone is the ability to connect it to a computer. This allows the individual to send photos, music, and other documents directly from the phone to the computer, and vice versa. There are three ways you can connect the iPhone to a computer. These are via a USB cord, Bluetooth, and Wi-Fi, each of which is done in different ways.Connect Using USB Cord
The
first way to connect the iPhone to the computer is by using a USB
cord. The USB cord should come with the iPhone. Simply plug in the USB
cord to your iPhone, and place the other side of the USB cord into the
USB port on the computer.
Connect to iTunes
After
connecting the USB cord to the computer, iTunes should automatically
run. If you do not see iTunes pop up, you may have connected the USB
cord into the wrong port. If you are sure you have connected properly,
manually open iTunes, as you may have automatic sync turned off.
Set Up iPhone
After
you have entered iTunes, a setup screen should appear. You will need
to name your device (i.e. Lisa's iPhone). Then, you will need to select
whether or not to have automatic syncs, and what documents will be
synced each time you connect the iPhone to your computer. After you've
customized your preferences, you can begin transferring documents
between your iPhone and computer.
Remove Connection from Computer
You
cannot simply remove the iPhone from the USB cord, as this can cause
damage to the files on the smartphone. Instead, you must eject the
device. You can do this by hitting the eject button located next to the
name of your iPhone in iTunes.
Connect Using Bluetooth
If
you don't have a USB cord, you may opt to connect using Bluetooth. In
order to connect your phone using Bluetooth, you will need to have a
computer that has Bluetooth capabilities.
*a) Turn on Bluetooth
*b) Search for Discoverable Devices on Your Computer
*c) Select Your Smartphone and Connect
*d) Transfer Files
*a) Turn on Bluetooth
*b) Search for Discoverable Devices on Your Computer
*c) Select Your Smartphone and Connect
*d) Transfer Files
Connect Using Wi-Fi
If you do not have a USB cord or a Bluetooth capable computer, you will need to try connecting with Wi-Fi.
*a) Find Available Wi-Fi Connections on iPhone
*b) Select the Wi-Fi Connection Being Used By Your Computer.
*c) Transfer Files
It is incredibly easy to connect an iPhone to a computer. There are three different connection options to choose from. Even if you don't have a USB cord or a computer with Bluetooth, you are still able to connect. After connecting, you will be able to send a variety of documents and files between both devices.
How to install WhatsApp and other apps on Nokia X from 'unofficial' sources
How to install WhatsApp and other apps on Nokia X from 'unofficial' sources
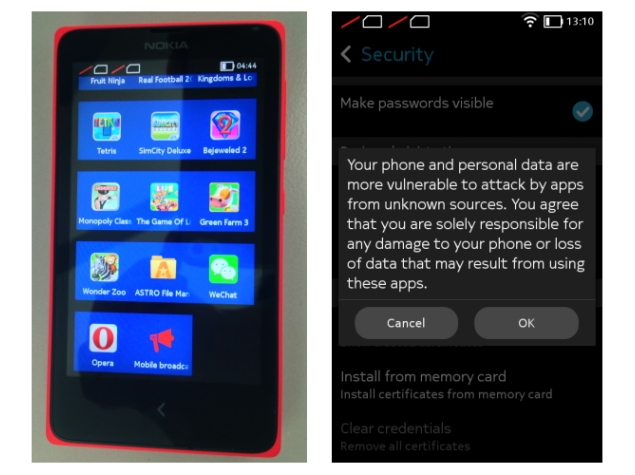
It's well known now that Nokia's new not-quite-Android budget smartphone, the Nokia X, is fully capable of running a huge number of Android apps, even those that aren't available in Nokia's own store app. Fortunately, it's also pretty easy to find these apps and install them. We'll take you through a simple tutorial so you can take advantage of this too.Due to competition with the Windows Phone platform and limitations of the AOSP (Android Open Source Project) fork that Nokia has created for the X family, the Google Play store is not available on the Nokia X. This means that a lot of popular apps, such as WhatsApp, aren't easily available to users.
 If
apps aren't available in Nokia's own store, users have the option of
checking any of four other Android app stores: 1mobile market, SlideME
market, Aptoide, and Yandex Store. These are available from the Nokia
store homepage as well as search results pages. Once installed, you can
use any of them just as easily as the native app store.
If
apps aren't available in Nokia's own store, users have the option of
checking any of four other Android app stores: 1mobile market, SlideME
market, Aptoide, and Yandex Store. These are available from the Nokia
store homepage as well as search results pages. Once installed, you can
use any of them just as easily as the native app store.For example, you can open the 1mobile market, and either choose a category to browse through or search for a title directly. Downloads and installs happen as usual.
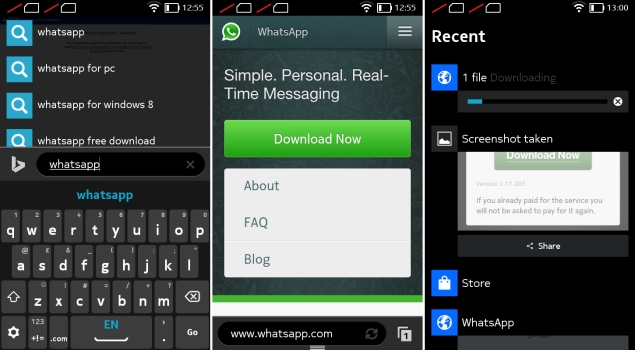
For apps that are still beyond reach, Nokia allows side-loading from third-party sources. Android apps can be downloaded in APK format, although security is definitely a concern since APK files can be manipulated and infected with malware just like PC software installation files.
 A
small number of companies such as Whatsapp offer APK files directly
from their own websites. Various download sites, such as
www.download.com, also offer APK files for certain apps. You can load
these files onto your Nokia X via a USB cable or simply download them
through the browser.
A
small number of companies such as Whatsapp offer APK files directly
from their own websites. Various download sites, such as
www.download.com, also offer APK files for certain apps. You can load
these files onto your Nokia X via a USB cable or simply download them
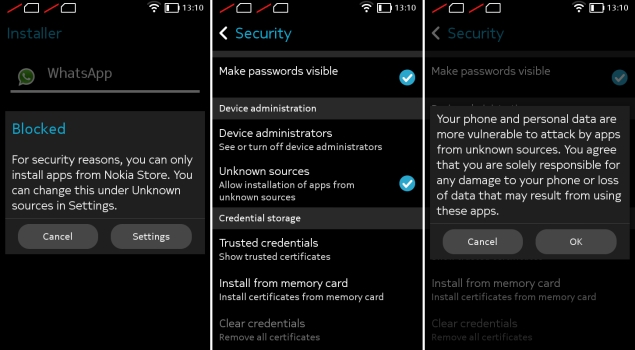
through the browser. You can tap the filename from the Fastlane screen if it's just been downloaded, or find it in the Downloads app. The first time you try installing an APK, you'll see an error message informing you that installing apps from third-party sources isn't allowed for security reasons, but that you can change this in the Settings.
When you tap the Unknown Sources checkbox in the Security sections to allow this, you'll see a second warning message. After this, you're free to install anything you like, accepting the risk. You can tap the APK filename again now, and installation will proceed without any trouble.
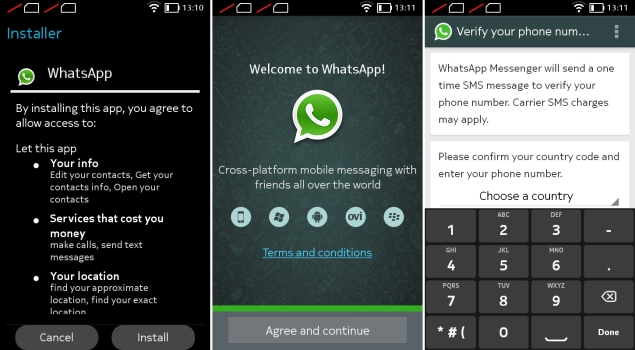 Some
apps, especially those which require Google services, might not run or
might have limited functionality. You won't be able to sign in to Google
services to share game scores, and location-sensitive apps which rely
on Google Maps also won't function.
Some
apps, especially those which require Google services, might not run or
might have limited functionality. You won't be able to sign in to Google
services to share game scores, and location-sensitive apps which rely
on Google Maps also won't function.
Subscribe to:
Comments (Atom)